A great leg day should train your quads, hamstrings, glutes, and calves without turning every exercise into a test of how much weight you can move. The goal here is simple: keep a small amount of heavy strength work, then make the rest of the session count for muscle growth.
This is the first leg workout in my Ultimate Push Pull Legs System. It combines a heavy squat, paused back-off sets, Romanian deadlifts, walking lunges, hamstring curls, calf work, and a weighted ab exercise. The details matter, especially your range of motion, exercise setup, and what actually limits each set.
Key Takeaways
- Combine one challenging squat top set with paused back-off sets and targeted hypertrophy work.
- Keep Romanian deadlifts close to your legs and walking lunges controlled through a consistent range of motion.
- Set up seated leg curls to load your hamstrings in a stretched position.
- Track weighted ab work and progressively increase reps or load to support muscle growth.
Table of Contents
- The Leg Day Workout at a Glance
- Warm Up Before Loading the Bar
- 1. Squat: One Heavy Top Set, Then Paused Back-Off Sets
- 2. Romanian Deadlift: Load the Hamstrings Without Losing Your Hinge
- 3. Walking Lunge: Make Your Legs the Limiting Factor
- 4. Seated Leg Curl: Get the Setup Right Before You Start
- 5. Leg Press Toe Press: Train Your Calves While Giving Your Back a Break
- 6. Decline Plate Crunch: Progress Your Abs Like Any Other Muscle
- Put the Workout Into a Complete Training Plan
The Leg Day Workout at a Glance
These are your working sets, not including warm-ups:
- Squat: 1 heavy set of 2 to 4 reps.
- Paused squat: 2 sets of 5 reps.
- Barbell Romanian deadlift: 3 sets of 8 to 10 reps.
- Dumbbell walking lunge: 2 sets of 10 reps per leg, or 20 total strides per set.
- Seated leg curl: 3 sets of 10 to 12 reps.
- Leg press toe press: 4 sets of 10 to 12 reps.
- Decline plate crunch: 3 sets of 10 to 12 reps.
Across this push pull legs routine, I use a minimalist approach to strength and an optimization approach to hypertrophy. That means just one hard set per week on each competition-style lift: the squat, bench press, and deadlift. Each lift then gets two back-off sets using a variation.
That one heavy set still needs to be challenging. Minimal volume does not mean minimal effort.
Warm Up Before Loading the Bar
Start with 5 to 10 minutes on a treadmill or StairMaster, then move through a short dynamic warm-up. You are about to train a huge amount of muscle, so leg day is not the session where I would skip this step.
My dynamic warm-up includes:
- Front-to-back leg swings.
- Side-to-side leg swings.
- Side lying twists.
- Hip rotations.
This looks like more work than it is. The dynamic portion usually takes me about two minutes at most.
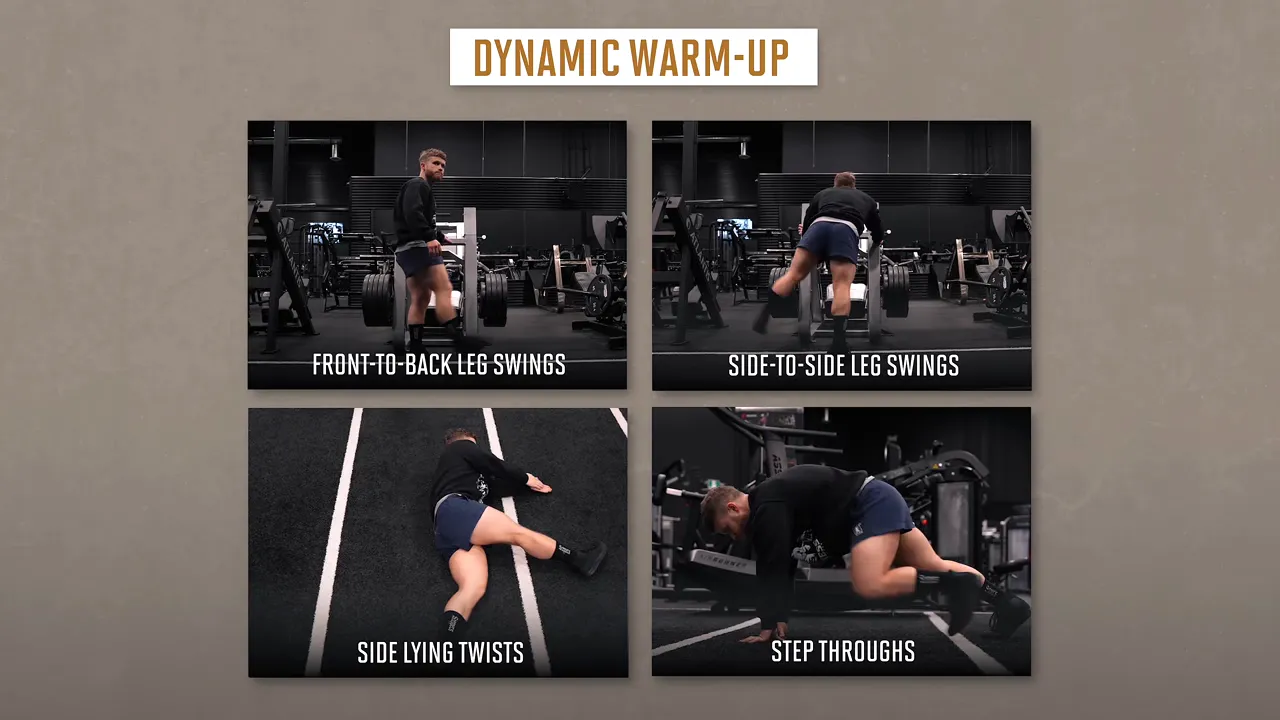
Next, build up to your squat working weight across four or five progressively heavier warm-up sets. The general warm-up gets you moving; these ramp-up sets prepare you for the specific load you are about to lift.
1. Squat: One Heavy Top Set, Then Paused Back-Off Sets
Choose a challenging weight without maxing out
For your heavy squat, perform 1 set of 2 to 4 reps at approximately 85% to 90% of your one-rep max.
If your max is 405 pounds, that puts your working weight around 345 to 365 pounds. Treat that percentage as a starting point, then check it against your effort. The target is roughly RPE 8 to 9, meaning you finish with about one or two good reps left in the tank.
This should not be an RPE 10, all-out max-effort set. But because you are only doing one heavy set, you should not finish feeling as though you could have knocked out another five reps.
Use a squat substitution if it fits your goals better
If you only care about building muscle, cannot squat, or simply do not want to squat, my first substitution is the hack squat. My second choice is the Bulgarian split squat.
For either option, increase the top-set rep range to 4 to 6 reps to make it a little more hypertrophy-focused, while keeping the rest of the structure the same.
Reduce the load for paused squats
After the heavy top set, do 2 sets of 5 paused squats. Pause for about one to two seconds in the bottom position on every rep.
Use approximately 75% of your top-set weight, not 75% of your one-rep max. For example, if your heavy set was 365 pounds, your paused sets would be around 275 pounds.
Here is how I cue these:
- Take a big breath and brace at the top.
- Sit back and down between your legs.
- Maintain your brace through the one- to two-second pause.
- Drive up with as much explosive intent as possible.
- Keep the bar traveling as close to a straight line as you can, centered over your midfoot.
Pausing reduces the contribution of stored elastic energy, making your quads and glutes work harder to get the weight moving from the bottom. Five paused reps are substantially harder than five normal reps, so you can create a strong muscle-building stimulus with a lighter load and less overall loading stress.
The pause also gives you a chance to practice consistent depth and reinforce technique that carries over to heavier squats.
2. Romanian Deadlift: Load the Hamstrings Without Losing Your Hinge
Next, perform 3 sets of 8 to 10 reps on the barbell Romanian deadlift.
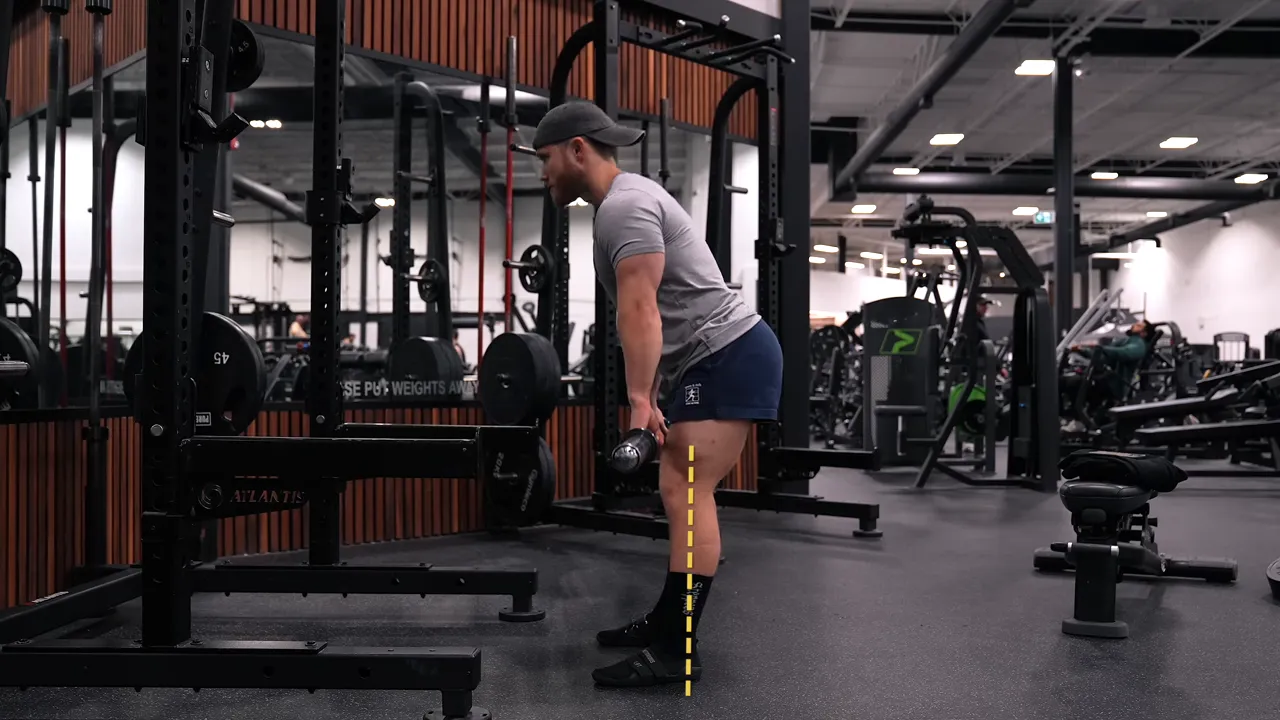
Take the bar out of the rack and step back two or three steps. Push your hips back as you lower the bar, keeping it close to your legs. A slight knee bend is fine, but your shins should stay more or less vertical.
Your bottom position will usually fall somewhere between just below your knees and mid-shin. Reverse the movement before your lower back starts to round, rather than chasing an arbitrary depth. Lift your chest and bring your hips forward to stand back up.
What if you only feel RDLs in your lower back?
First, check whether the bar is drifting away from your legs. When it moves forward, your lower back has to work harder to control the load. Think straight down and straight up, with the bar staying close and centered over your midfoot.
I also find that a lifting belt helps me focus more on my hamstrings and reduces that uncomfortable lower-back pump I sometimes get during RDLs. That is a personal observation, not evidence that belts switch off your spinal erectors. As discussed in this review of lifting belt research, wearing a belt does not appear to substantially reduce lower-back muscle activity overall.
Your spinal erectors have to work to keep your torso from folding forward. You cannot take them completely out of an RDL. The goal is to improve the hamstring emphasis, not eliminate every sensation in your back.
Adjust the emphasis toward glutes or hamstrings
- For more glute emphasis: Think about using your glutes to bring your hips forward. You can add a glute squeeze at the top if it helps you find the muscle, almost like a vertical hip thrust. The squeeze itself probably is not adding much, but the cue can be useful.
- For more hamstring emphasis: Cut out the top 10% to 25% of the movement and focus on the stretched portion. You can also add a brief pause at the bottom to emphasize that stretch.
3. Walking Lunge: Make Your Legs the Limiting Factor
Perform 2 sets of 10 reps per leg with dumbbells. That is 20 total strides per set.
Walking lunges are pretty brutal, which makes it tempting to rush through them. But they deserve the same controlled execution as any other hypertrophy exercise. There are three mistakes I would focus on avoiding.
Do not cut your depth short
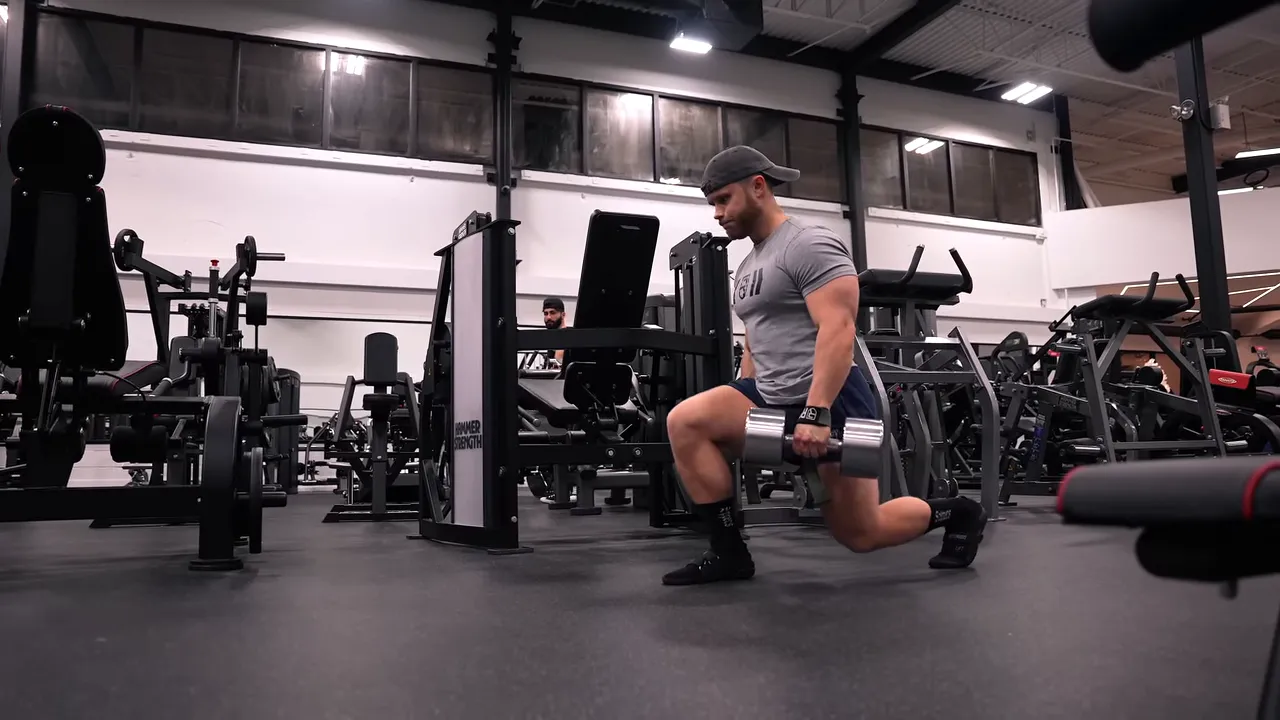
I aim for my back knee to make soft contact with the floor on each rep. As the set gets harder, it is common to start taking shallower reps just to reach the target number.
Consistent reps are more useful than hitting an arbitrary rep count with a progressively shorter range of motion.
Do not free-fall through the lowering phase
If touching your knee to the floor sounds painful, pay attention to how you are descending. You should be actively controlling and resisting the negative, not dropping into the bottom position.
Take your time. The goal is a soft touch, not slamming your knee into the ground.
Do not let grip strength end the set
A lot of people choose dumbbells that are easy to hold, then stop when the exercise feels tiring rather than when their legs are close to muscular failure.
We are not trying to train forearms here. If grip is limiting your lunges, use lifting straps so you can choose a load that actually challenges your legs by the end of the set.
4. Seated Leg Curl: Get the Setup Right Before You Start
Perform 3 sets of 10 to 12 reps on the seated leg curl.
I favor the seated version because it challenges the hamstrings in a more lengthened position. A 12-week training study published in 2021 found approximately 56% greater hamstring muscle growth with seated curls than lying curls.
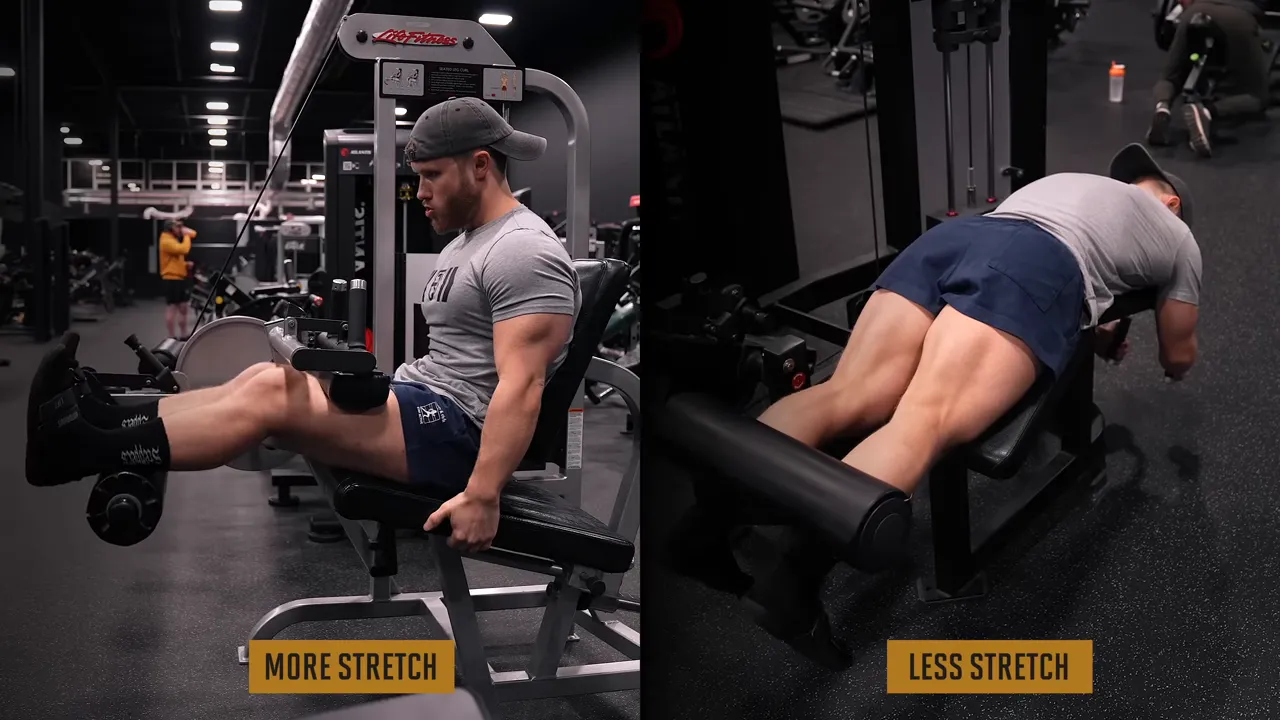
The likely explanation is the greater hamstring stretch created by the flexed-hip position. But selecting the seated machine is only part of the equation. Your setup still matters.
Start with tension in the stretched position
If you set the backrest too far back, you can lose much of that stretched position. Adjust the machine so your torso is far enough forward that you feel a solid hamstring stretch before starting the set.
If you do not feel that passive tension with your legs extended, adjust the backrest or try leaning forward slightly over the machine.
Experiment with toe position, but keep the evidence in perspective
EMG research on leg rotation suggests that turning your toes inward can increase activation of the inner hamstrings, while turning them outward can increase activation of the outer hamstrings.
An easy way to remember this is to point your toes toward the region you want to emphasize:
- Toes slightly out: Outer hamstrings.
- Toes slightly in: Inner hamstrings.
- Toes straight ahead: A neutral option.
However, EMG is not a validated predictor of long-term muscle growth. Think of this as something to experiment with, not a proven way to produce regional hypertrophy.
Since there are three sets, you could try toes slightly out on set one, slightly in on set two, and straight ahead on set three. If one position feels much better, use it. If a position feels awkward or uncomfortable, there is no reason to force it.
5. Leg Press Toe Press: Train Your Calves While Giving Your Back a Break
Perform 4 sets of 10 to 12 reps on the leg press toe press.
After the squats, RDLs, and lunges, I like being able to sit down, give my back and hips a break, and focus entirely on my calves.
Toe position can change the regional emphasis here too. Unlike the hamstring recommendation, this has support from a study that measured muscle growth directly.
A 2020 calf-training study followed 22 participants over nine weeks and compared toes-out, toes-in, and straight-ahead positions. The results suggested:
- Toes out: Greater growth in the medial, or inner, calf.
- Toes in: Greater growth in the lateral, or outer, calf.
- Toes straight ahead: Relatively even growth across both regions.
Notice that this is the opposite of the hamstring cue. For calves, pointing your toes out emphasizes the inside; pointing them in emphasizes the outside.
My suggested four-set sequence is toes out for set one, toes in for set two, and straight ahead for sets three and four.
Again, comfort and performance come first. If a position feels awkward or significantly limits the load you can use, stick with the position where you feel strongest and most comfortable.
6. Decline Plate Crunch: Progress Your Abs Like Any Other Muscle
Finish with 3 sets of 10 to 12 reps on the decline plate crunch.
Direct ab training does not fit perfectly into a push, pull, or legs category. I usually put it on leg days because many ab movements also involve the hip flexors, which are already warmed up by this point.
Hold a plate against your chest and focus on bringing your abs together. Do not simply hinge at the hips, which shifts more of the work toward your hip flexors. Instead, allow your lower back to round as you contract your abs.
Track the load and reps you use, then aim to add a rep or a little weight over time. Your abs need progressive overload just like any other muscle you want to grow.
A few challenging, progressively overloaded sets can do much more for building that muscular “pop” in your midsection than treating every ab workout like a cardio circuit, and they take a fraction of the time.
Put the Workout Into a Complete Training Plan
The big idea is not to make every movement as heavy or exhausting as possible. Keep the top squat set challenging, use the paused sets to reinforce technique, and make the remaining exercises target the muscles they are supposed to train.
This session completes the first half of the six-workout training sequence. My full Ultimate Push Pull Legs System includes 12 weeks of training, an ebook explaining the methods, an Excel spreadsheet, exercise demonstrations, and coaching cues for every exercise. It also comes in four-, five-, and six-day-per-week versions, so six available training days are not a requirement.
|


