A great push workout needs more than a heavy bench press and a few sets of pressdowns. I want a session that challenges the chest, shoulders, and triceps through different positions, combines heavy loading with controlled hypertrophy work, and gives every exercise a clear purpose.
This is the first push day in my push pull legs system. The priority here is maximum effectiveness rather than minimum training time. We’ll use both horizontal and vertical pressing, finish the chest with a cable movement and stretching, then train the shoulders and triceps through some less conventional angles.
This routine is designed for intermediate to advanced trainees. If you’re still in your first year or two of lifting, I’d suggest building your foundation with a more basic program before moving into this level of volume and exercise specialization.
Key Takeaways
- Combine horizontal and vertical pressing to emphasize both chest and shoulder development.
- Follow the heavy bench set with controlled Larsen presses that eliminate leg drive.
- Brief inter-set pec stretching may support growth without adding substantial training time.
- Train shoulders and triceps through complementary angles and both stretched and contracted positions.
Table of Contents
- The Push Day Workout at a Glance
- Warm Up Before the Heavy Work
- 1. Bench Press: One Heavy Top Set
- 2. Larsen Press: Controlled Pressing Without Leg Drive
- 3. Standing Dumbbell Arnold Press: Train the Shoulders With Progressive Loading
- 4. Cable Press-Around and Pec Stretch: Finish the Chest
- 5. Crossbody Cable Y-Raise: Load the Delts in a Stretched Position
- 6. Triceps Superset: Squeeze-Only Pressdowns and Stretch-Only Overhead Extensions
- 7. Crossbody Triceps Extension: Finish With a Different Shoulder Position
- How This Push Workout Fits Into the Full Program
The Push Day Workout at a Glance
There are seven exercise slots, with a chest stretch paired into the fourth slot and two triceps movements combined in the sixth:
- Bench press: 1 working set of 3 to 5 reps.
- Larsen press: 2 sets of 10 reps.
- Standing dumbbell Arnold press: 3 sets of 8 to 10 reps.
- Cable press-around: 2 sets of 12 to 15 reps per side, paired with a 30-second pec stretch after each side.
- Crossbody cable Y-raise: 3 sets of 12 to 15 reps.
- Triceps superset: 3 rounds of 8 squeeze-only pressdowns followed immediately by 8 stretch-only overhead extensions.
- Crossbody triceps extension: 2 sets of 10 to 12 reps.
Warm Up Before the Heavy Work
Start with five minutes on a treadmill or StairMaster, then do a few upper-body dynamic drills, such as arm circles and cable external rotations.
Before the heavy bench set, work through a full warm-up pyramid. The goal is to prepare physically and mentally for the top set, not jump straight from an empty bar to a near-maximal load.
For example, here’s the pyramid I used before a 295-pound working set:
- 45 pounds for 10 to 15 reps.
- 135 pounds for 5 reps.
- 185 pounds for 3 reps.
- 225 pounds for 2 reps.
- 275 pounds for 1 rep.
- 295 pounds for the working set of 3 to 5 reps.
Those are my loads, not universal targets. The useful principle is to increase the weight while reducing the reps as you approach your working weight.
1. Bench Press: One Heavy Top Set
Prescription: 1 working set of 3 to 5 reps, near maximal effort.
We’re opening with one heavy set while we’re fresh. This should be a challenging set, but near maximal doesn’t mean letting your technique fall apart.
Build a stable setup
Use an arch that feels comfortable. It doesn’t need to be a huge powerlifting-style arch. What matters most is getting tight and stable, with your upper back firmly anchored into the bench.
- Pinch your shoulder blades together and tuck them down.
- Keep your butt, upper back, and head in contact with the bench during the set.
- If you have a spotter, ask for a gentle lift-off rather than an aggressive yank that disrupts your position.
Without a lift-off, raising your butt briefly during the unrack can help you get the bar out. Bring it back down onto the bench before beginning your reps. This is an unracking technique, not permission to lift your hips during the set.
Press with intent
Lower the bar down and slightly forward until it reaches the highest contact point on your chest. Then press up and slightly back with as much explosive intent as possible.
Keep the elbows slightly tucked as you lower. You can allow them to flare somewhat as you press, but don’t force that if it bothers your shoulders.
The pec fibers fan out across a fairly broad area, so there isn’t one exact elbow angle everyone must use. A range from roughly no tuck to about 30 degrees of tuck can line up well with much of the chest musculature. Within that range, choose a position that lets you feel your pecs working, produce good force, and avoid pain.
How hard should the set be?
The last rep or two should slow down noticeably. You’re working hard, but your setup and bar path remain controlled. At the end, you might have one more rep available, but probably not more than that.
If barbell bench pressing doesn’t suit you, substitute a flat dumbbell press or machine chest press for the same number of sets and reps.
A note on bench depth and arching
The IPF’s 2023 technical rules introduced an elbow-depth requirement to address extremely shortened ranges of motion. In practical terms, the bottom of the elbow needs to reach the level of, or below, the top of the shoulder joint.
That’s a competition rule rather than a requirement for every gym session. Still, it’s useful context: if you use a moderate arch rather than an extreme one, reaching that depth generally shouldn’t be a major issue.
2. Larsen Press: Controlled Pressing Without Leg Drive
Prescription: 2 sets of 10 reps, using approximately 75% of your top-set bench weight.
After the heavy bench set, reduce the load. If you benched 295 pounds, about 225 pounds is a practical starting point for the Larsen press.
The Larsen press is a bench press with your feet elevated instead of planted on the floor. I like supporting my feet on another bench or a box so they aren’t hanging unsupported, which makes balancing easier.
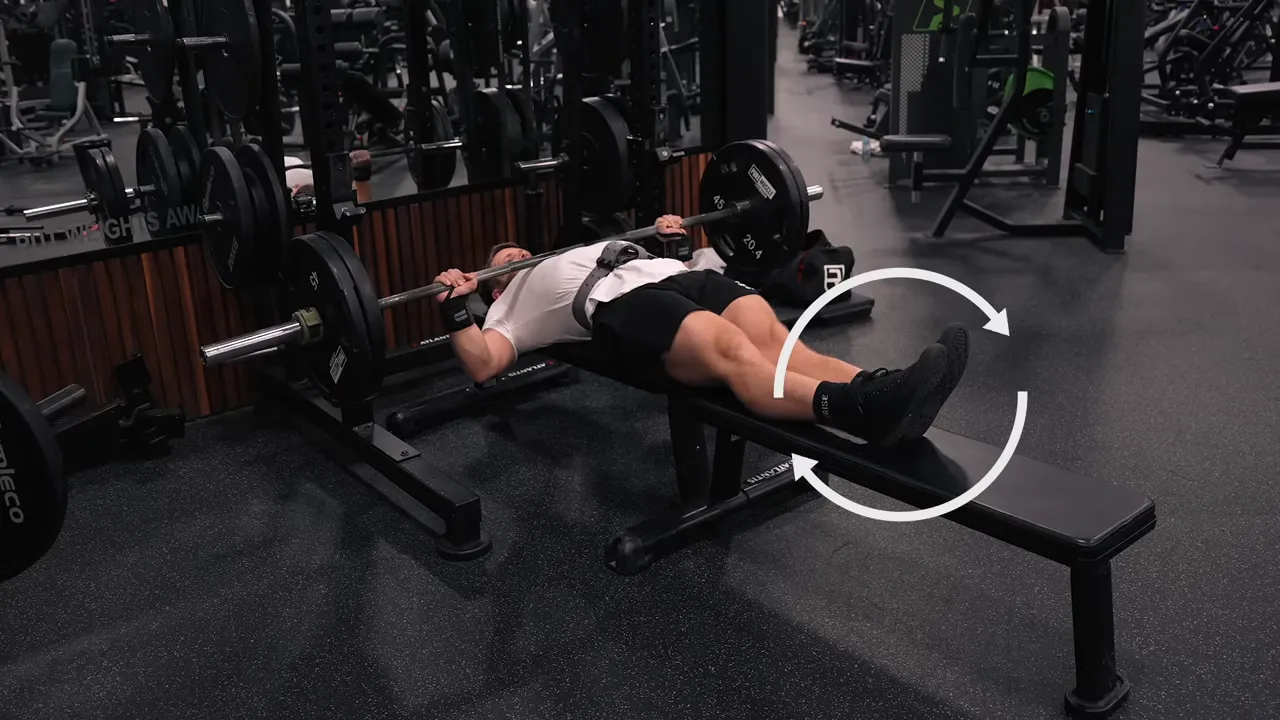
Keep the same basic upper-body setup and comfortable arch. The important difference is that you’ve removed leg drive, placing the pressing demand more squarely on the pecs, front delts, and triceps.
I also use a slightly closer grip here. That increases the range of motion and shifts the emphasis somewhat toward the upper pecs and triceps.
Unlike the heavy top set, these reps aren’t about moving the bar as explosively as possible. Use a smooth, controlled tempo:
- Lower for about 1 to 2 seconds.
- Touch the chest softly.
- Press up over about 1 to 2 seconds.
Think about the pecs and triceps stretching and contracting rather than simply moving the bar from one point to another.
3. Standing Dumbbell Arnold Press: Train the Shoulders With Progressive Loading
Prescription: 3 sets of 8 to 10 reps.
For a thorough push day, I generally like including a horizontal press to emphasize the pecs and a vertical press to emphasize the shoulders.
If time is extremely limited, an incline press can combine elements of both. Here, though, we’re prioritizing a more complete session, so we’re keeping both pressing patterns.
For the standing Arnold press:
- Start with the dumbbells in front of you, palms facing toward you.
- Press upward while rotating and opening the elbows outward.
- Reach full elbow extension.
- Reverse the movement under control.
I used to treat this mainly as a lighter, higher-rep pump exercise, often sticking with 30- or 40-pound dumbbells. More recently, I worked up to 60-pound dumbbells for sets of 8 to 10 by treating it a little more like a serious overhead press.
Squeezing my glutes and thinking about driving through my heels helps create a stronger, more stable base. I still want to feel the delts working, but I’m also focused on gradually increasing the load.
You don’t have to choose between a good mind-muscle connection and progressive overload. This movement can sit somewhere between the two. A lifting belt and wrist wraps can also make a noticeable difference in how supported you feel.
4. Cable Press-Around and Pec Stretch: Finish the Chest
Prescription: 2 sets of 12 to 15 reps per side, each followed by a 30-second stretch for that pec.
The cable press-around combines elements of a cable fly and a cable press, performed one arm at a time. The defining feature is that you press around your body and past the midline.
Most chest exercises stop at or before the midline. A press-around lets you move farther across the body to emphasize the shortened, contracted position of the pecs.
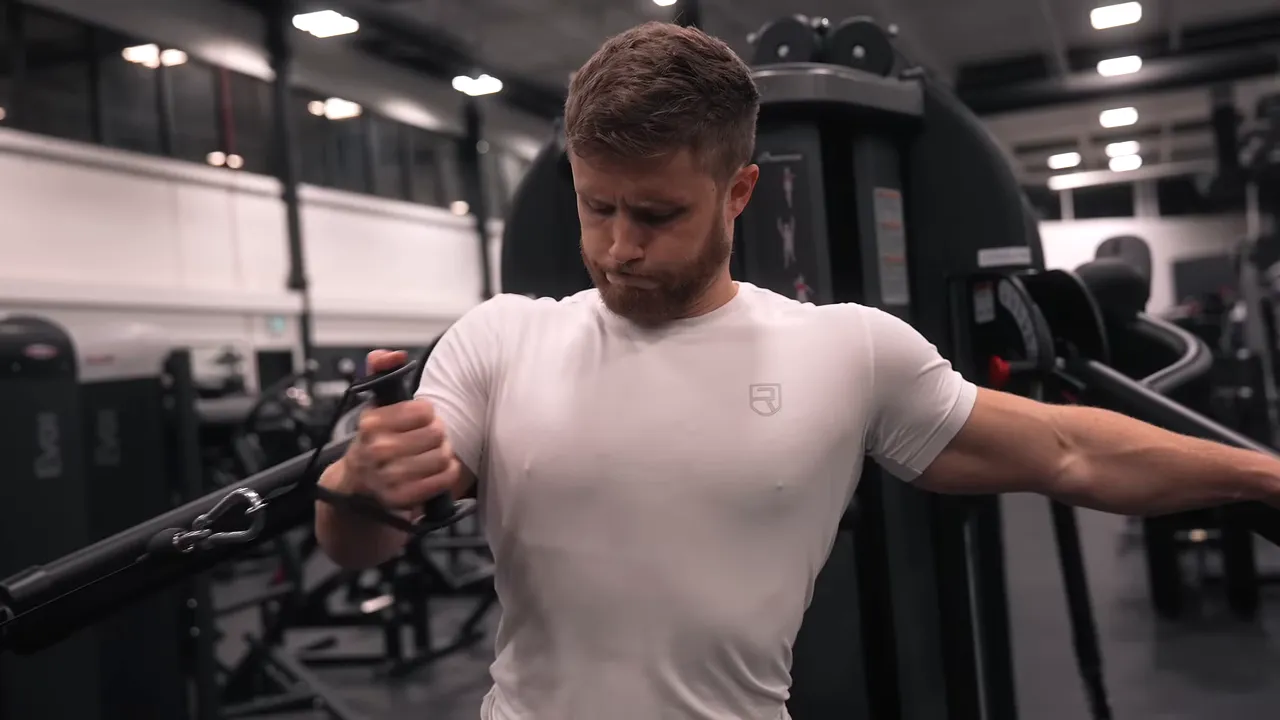
This exercise can feel awkward at first. Give yourself a few weeks to experiment with it before deciding whether it works for you.
Is that extra end-range contraction essential for hypertrophy? I’m not sure. It hasn’t been directly established in this context. I like including it because it trains a position that other chest exercises tend to miss, without needing to sacrifice the stretched part of the movement.
How to pair it with the stretch
- Perform 12 to 15 press-arounds with one arm.
- Stretch that same pec for 30 seconds.
- Perform the press-arounds with the other arm.
- Stretch that pec for 30 seconds.
- Repeat for the second set.
Use a stretch intensity of about 7 out of 10: a strong stretch, but stop short of pain or significant discomfort.
Why include stretching between sets?
In one study on inter-set stretching, traditional training produced an average muscle-thickness increase of 6.2 millimeters, while training with stretching between sets produced an average increase of 9.4 millimeters. That’s approximately 50% greater growth in that study, not a promise that adding pec stretches will increase everyone’s results by 50%.
A later review of inter-set stretching concluded that it may enhance muscular adaptations without increasing training time, since the stretching can fit into periods otherwise spent resting.
I see this as a promising addition rather than a guaranteed growth multiplier. We’re also placing it after the final chest exercise, so there’s no remaining chest pressing to worry about.
Brief static stretching is different from prolonged stretching, too. The concern about reducing strength becomes more relevant with longer holds, particularly beyond roughly 60 to 90 seconds. Our 30-second holds keep this conservative.
5. Crossbody Cable Y-Raise: Load the Delts in a Stretched Position
Prescription: 3 sets of 12 to 15 reps.
I first came across this variation through Alberto Nuñez, who described getting a better shoulder stretch than he did with a conventional cable lateral raise.
I’m still a fan of leaning cable lateral raises, but your torso can limit how far the arm travels across the body. If you want to stretch the side delts more, bringing the arm across the torso makes sense. The crossbody Y-raise takes that position and loads it.
Start with the working arm reaching across your body. Think about drawing a sword, then lifting it up and out into a diagonal Y position.
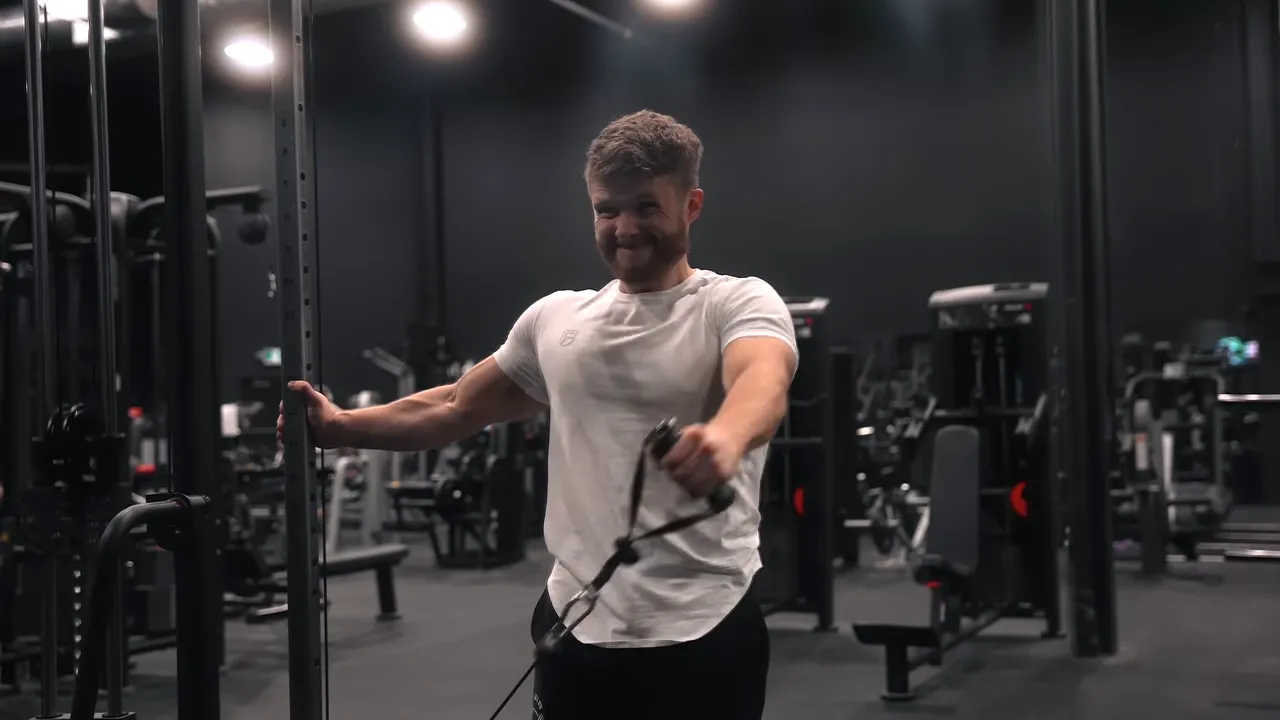
The key mistake is turning this into a front raise. You’re not pulling the cable straight up in front of you. Lift out and back along a diagonal path.
Why use a different shoulder angle?
We normally describe the deltoids as having three heads: anterior, lateral, and posterior. But anatomical research on the deltoid describes seven intramuscular segments, suggesting a more complex structure than those three broad labels imply.
That doesn’t prove one specific raise is best for a particular segment. It does provide a rationale for using slightly different arm paths instead of assuming one lateral-raise angle covers everything equally.
My practical takeaway is to include some variation in the planes you train. That may help develop the whole shoulder and build a rounder, more complete look.
6. Triceps Superset: Squeeze-Only Pressdowns and Stretch-Only Overhead Extensions
Prescription: 3 rounds of 8 pressdown partials immediately followed by 8 overhead-extension partials.
This pairing came from Hypertrophy Coach, and it clicked as soon as I tried it. We’re using two partial-range movements that complement each other rather than just cutting reps short randomly.
Squeeze-only pressdown
Perform only the second half of the pressdown, moving through the portion closest to elbow lockout. Keep the work concentrated in the contracted part of the rep.
In this setup, that’s the challenging portion of the pressdown. The idea is to spend your reps where the exercise is hardest.
Stretch-only overhead extension
Immediately turn around and move into an overhead cable extension. Perform only the first half of the movement, working from the deeply bent-elbow position through the stretched portion of the rep.
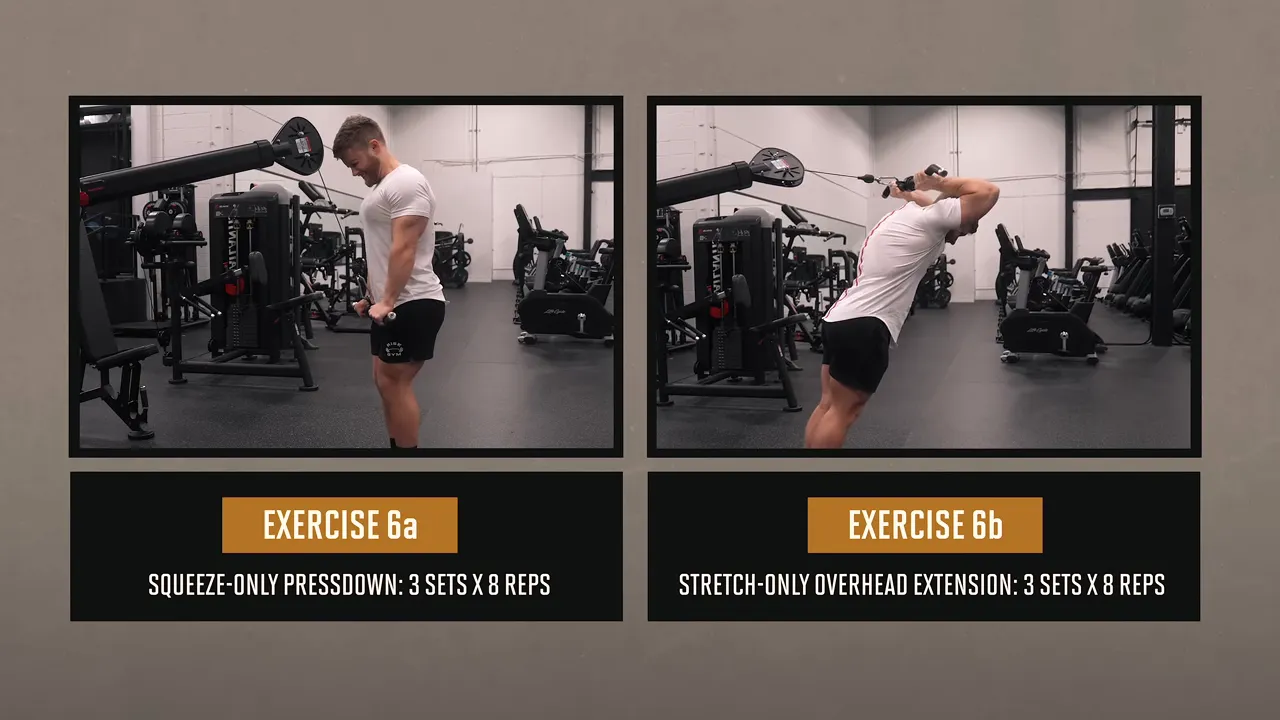
The overhead extension matters because pressdowns don’t provide the same deep triceps stretch. Since training at longer muscle lengths is likely an important part of the growth stimulus, I don’t want the contracted-position work to be the whole story.
Do the two exercises back to back without resting between them. Eight reps of each completes one round. It’s a fun combination that makes the triceps work in a noticeably different way.
7. Crossbody Triceps Extension: Finish With a Different Shoulder Position
Prescription: 2 sets of 10 to 12 reps.
The final exercise adds a little more direct triceps volume with the arm positioned away from the usual tucked-at-your-side setup.
Use the cable to perform a crossbody extension with the upper arm flared outward. The goal is not simply novelty. The long head of the triceps crosses both the elbow and shoulder joints, so changing the shoulder position can affect how the muscle is loaded.
I wouldn’t claim we can confidently map every shoulder angle to a specific region of triceps growth. The evidence doesn’t support that level of precision, and individual differences probably matter.
The more useful recommendation is to include triceps exercises with different shoulder positions, periodically rotating variations rather than relying exclusively on tucked-arm pressdowns.
How This Push Workout Fits Into the Full Program
This session is the first push day from the initial phase of my 12-week Ultimate Push Pull Legs System. The full plan changes the training emphasis across three four-week phases:
- Phase 1, weeks 1 through 4: Moderate to high volume with moderate to high effort, using workouts like this one.
- Phase 2, weeks 5 through 8: Lower volume with ultra-high effort.
- Phase 3, weeks 9 through 12: A supercompensation phase with volume pushed above phase 1 and very high-rep, metabolic-style training.
The rationale for phase 3 is that the lower-volume phase may leave you more responsive to an increase in volume afterward. Following week 12, there’s a full deload week. You can then repeat the program while you’re continuing to make progress.
The system includes a progress-tracking spreadsheet, an explanatory ebook, and an exercise demonstration library covering more than 75 exercises. It’s intended for intermediate to advanced lifters. For newer trainees, I recommend completing my Fundamentals Hypertrophy Program at least once first.
The bigger principle behind this push day is straightforward: use heavy pressing where it belongs, control the accessory work, and train the chest, shoulders, and triceps through complementary positions. Every exercise should contribute something to the session rather than just add more fatigue.
|


