A great pull workout needs more than a few heavy rows and some curls. You want a vertical pull, a horizontal pull, direct rear delt work, and biceps training that combines progressive overload with a strong stimulus in the stretched position.
This six-exercise session is the first pull day in my Ultimate Push Pull Legs System. Compared with my 2018 and 2021 routines, which balanced strength and hypertrophy more evenly, this version is much more bodybuilding focused. That means more exercise variation, some new intensity techniques, and more attention to how each movement loads the target muscles.
The full routine still includes a minimalist approach to the squat, bench press, and deadlift: just enough volume to make progress, with substitutions available if you want to focus entirely on bodybuilding. Here, the priority is building your back, rear delts, and biceps.
Key Takeaways
- Build your pull day around a vertical pull and a horizontal pull.
- Use pulldown feeder sets to refine technique and select an appropriate failure-set weight.
- Vary row grips and face pull angles to train your back from different directions.
- Combine progressively overloaded curls with stretched-position preacher curls for a more complete biceps session.
Table of Contents
- The Pull Workout at a Glance
- Warm Up Before Your First Pull
- 1. Lat Pulldown: Build Into Two Failure Sets
- 2. Omni-Grip Chest-Supported Row: Three Grips, Three Sets
- 3. Bottom-Half Dumbbell Pullover and Static Lat Stretch
- 4. Omni-Direction Face Pull: Change the Pulling Angle
- 5. EZ-Bar Biceps Curl: Make Progressive Overload a Priority
- 6. Bottom-Half Preacher Curl: Finish in the Stretched Position
- Putting the Pull Day Together
The Pull Workout at a Glance
- Lat pulldown: Four progressively heavier sets of approximately 10 reps, with the fourth reaching failure, followed by one more failure set and a mini drop set.
- Omni-grip chest-supported row: 3 sets of 10 to 12 reps, using a different grip each set.
- Bottom-half dumbbell pullover: 2 sets of 10 to 12 reps, supersetted with a 30-second static lat stretch per side.
- Omni-direction face pull: 3 sets of 12 to 15 reps, changing the cable height each set.
- EZ-bar biceps curl: 3 sets of 6 to 8 reps.
- Bottom-half preacher curl: 2 sets of 10 to 12 reps per arm.
Warm Up Before Your First Pull
Start with five minutes on a treadmill or StairMaster. Follow that with approximately 10 arm circles per side and 10 cable external rotations per side.
From there, move into the progressively heavier pulldown sets. These prepare you for the first hard effort while giving you a chance to establish a good mind-muscle connection with your back.
1. Lat Pulldown: Build Into Two Failure Sets
For the lat pulldown, I use a feeder-set approach I learned from my mentor, John Meadows. Rather than jumping quickly to a working weight, you gradually increase the load over several sets until you reach an all-out set.
How to Progress Through the Sets
- Set 1: Use a light weight for 10 reps at roughly RPE 4 to 5. This should feel easy and get the blood flowing.
- Set 2: Rest one to two minutes, increase the weight, and perform 10 reps at roughly RPE 6 to 7.
- Set 3: Rest another one to two minutes, increase the weight again, and perform 10 reps at roughly RPE 7 to 8. You should still have approximately two or three reps available.
- Set 4: Increase the weight one final time and aim for 10 reps at RPE 10, reaching technical failure.
That fourth set is your first failure effort, not an additional easy warm-up. Afterward, rest two to three minutes and perform one more set to failure with the same weight.
Challenge yourself to match your first failure set, but expect fatigue to reduce your reps. If you got 10 on the first effort, seven or eight on the second is a realistic outcome.
Immediately after that second failure set, reduce the weight by approximately 30 percent and complete another four or five controlled reps.
Why Use Feeder Sets?
The obvious criticism is that all those preliminary reps can fatigue you before your hardest set. That is fair. On most exercises, especially when my priority is moving more weight, I prefer a shorter warm-up with fewer sets and reps.
But pulldowns are also an exercise where many people struggle to feel their back working. Here, feeder sets can serve two useful purposes:
- They help you find your groove. Repeating the movement lets you settle into a pulling pattern that engages your lats well.
- They help you choose the right load. If the third set already feels heavy, make a small increase. If it still feels easy, you have room for a bigger jump.
The mini drop set serves a different purpose. On pulldowns, you can reach the point where another clean rep is impossible even though you could keep going by cheating. Rather than adding more momentum, I lower the weight and finish with controlled reps.
Grip and Technique
Use a medium overhand grip, approximately 1 to 1.5 times shoulder width, and keep it consistent throughout the sequence. The point is to establish a repeatable movement and strength baseline.
A very wide grip shortens the range of motion, while a very close grip can make the biceps feel more dominant. For me, the medium grip is a useful middle ground.
I recommend straps on the failure sets so grip strength does not end the set before your back does. I also find that straps often improve the mind-muscle connection. Without straps, a thumbless grip is another cue I have found helpful in coaching.
Finally, you do not need to lock your torso into a completely rigid position. A little natural leaning or rocking is fine, provided you can still feel your back pulling and stretching under control. Keep the lowering phase controlled rather than turning the movement into a momentum exercise.
2. Omni-Grip Chest-Supported Row: Three Grips, Three Sets
Next, perform 3 sets of 10 to 12 reps on a chest-supported row. “Omni-grip” simply means changing your grip from set to set:
- Set 1: Wide grip.
- Set 2: Medium or slightly closer grip.
- Set 3: Neutral or underhand grip.
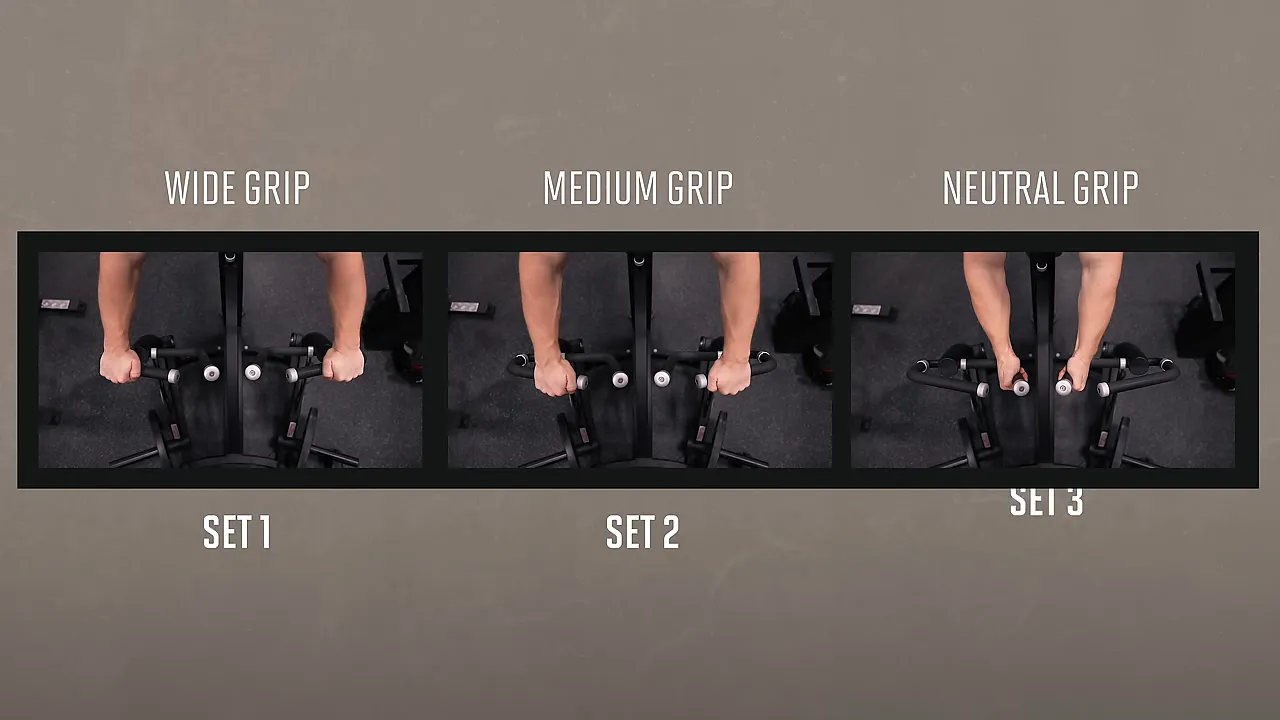
I use a Panatta chest-supported machine, but the exact brand is not important. Choose a chest-supported row that feels good on your back. A chest-supported T-bar row works, and if you do not have machine access, a Helms row with dumbbells is a solid substitution. Brace your chest against the back of an incline bench and row from there.
In my opinion, every pull day should include at least two main movement patterns: a vertical pull and a horizontal pull.
Both train much of the back, but they have different emphases. Pulldowns emphasize the lats and teres muscles, while rows emphasize the traps and rhomboids of the mid-back, especially when you actively squeeze your shoulder blades together.
The back is not one simple muscle. It is a collection of muscles that pull on the skeleton in slightly different ways. Varying your grip gives you a practical way to train those muscles from somewhat different angles.
3. Bottom-Half Dumbbell Pullover and Static Lat Stretch
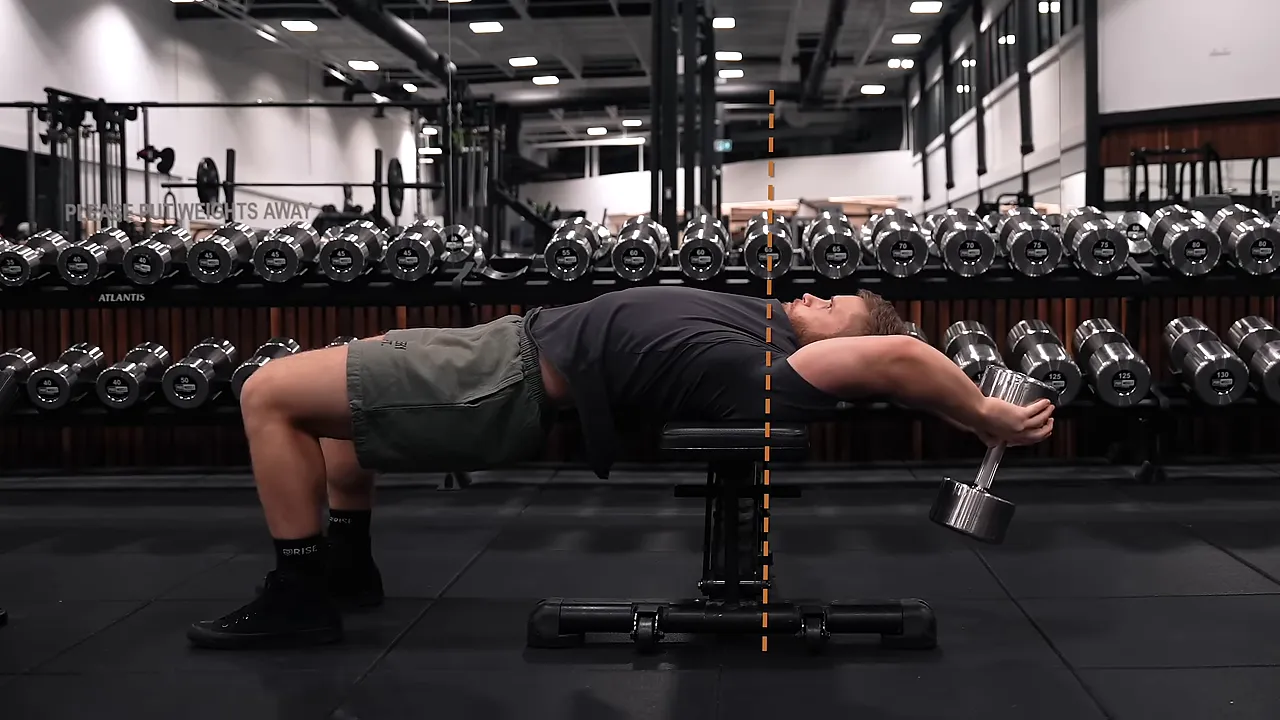
For the third exercise, pair 2 sets of 10 to 12 bottom-half dumbbell pullovers with a static lat stretch.
Bottom-half pullovers stay in the stretched portion of the movement. Lower the dumbbell behind your head, then bring it back through only the lower portion of the arc rather than finishing directly above your chest. At the top of a conventional dumbbell pullover, there is very little tension on the lats, so we are cutting that portion out.
Why I Still Include Pullovers
Some coaches argue that pullovers are a poor lat exercise because the lats do not have their best leverage when the arms are overhead. But less favorable leverage does not mean the muscle cannot experience tension.
The lats still have leverage at the shoulder in this position, and I like pullovers as a stretch-focused exercise for two practical reasons: I feel a strong lat stretch during them, and my lats are consistently sore for a day or two afterward.
Neither sensation nor soreness proves that an exercise is effective for muscle growth. I would not use either one alone to make all my exercise-selection decisions. But when those signals line up consistently over years of training, I think they can be useful clues.
The stronger test would be a long-term study comparing lat growth in people doing pullovers with a suitable comparison group. At the time I put this routine together, I was not aware of a study directly answering that question. So I consider pullovers a reasonable option, not an exercise with definitively established superiority.
How to Run the Superset
- Perform your first set of pullovers.
- Stretch your right lat for 30 seconds.
- Stretch your left lat for 30 seconds.
- Rest for 30 seconds.
- Perform your second set of pullovers.
- Stretch your left lat for 30 seconds, then your right lat for 30 seconds.
Switching which side goes first keeps the sequence balanced.
For the stretch, grab something solid with one hand and lean your hips back until you feel a deep stretch along that side of your back. Hold at approximately 7 out of 10 intensity, stopping short of pain or discomfort, then change sides.
4. Omni-Direction Face Pull: Change the Pulling Angle
Perform 3 sets of 12 to 15 reps on face pulls, changing the cable position for each set:
- Set 1, low to high: Position the cable low and pull upward toward your face.
- Set 2, middle: Position the cable at shoulder height and pull more or less straight across.
- Set 3, high to low: Position the cable high and pull downward toward your eyes.
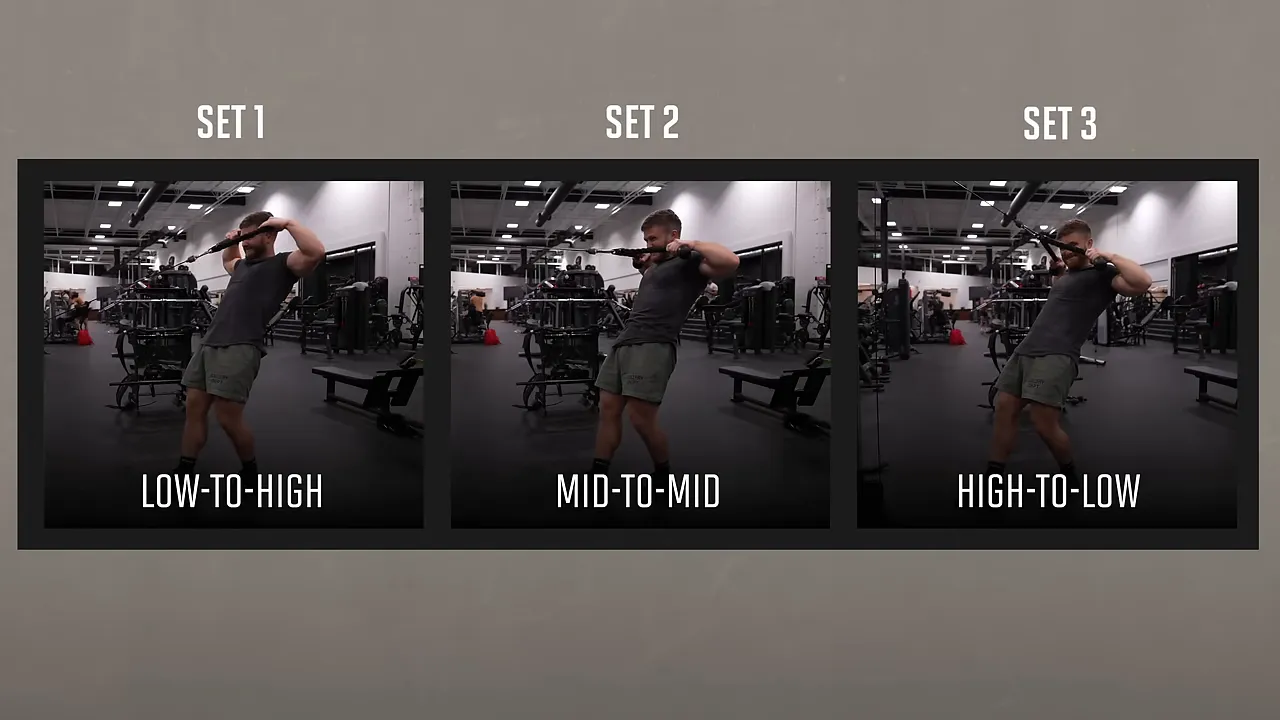
This gives the rear delts and upper back work from several directions. The logic is the same as with the row grips: the back is a complex group of muscles, so some angle variation makes sense when the goal is maximizing development.
That does not mean every back workout needs endless variations. A vertical pull and a horizontal pull provide the foundation. The additional angles are a way to build on that foundation.
5. EZ-Bar Biceps Curl: Make Progressive Overload a Priority
For EZ-bar curls, perform 3 sets of 6 to 8 reps.
A lot of people approach all their biceps training as pump work. They chase the burn and focus on feeling the muscle, but never give much attention to getting stronger. I think both approaches have a place.
Here, use a challenging weight and treat the exercise more like a lift you want to progress. Track your load and reps over time, then work toward increasing one or the other as your performance improves.
Keep your form consistent so the progress means something. A little hip drive to initiate the lifting phase is acceptable, but it should not become a completely different movement as the weight increases. Control the negative on every rep.
6. Bottom-Half Preacher Curl: Finish in the Stretched Position
Finish with 2 sets of 10 to 12 reps per arm on bottom-half preacher curls. These are partial reps performed only in the lower, more lengthened portion of the movement.
I included this exercise partly because of a 2021 study on preacher curl range of motion. Researchers assigned 32 participants to one of three groups:
- Bottom-half training: Preacher curls from 0 to 50 degrees of elbow flexion.
- Top-half training: Preacher curls from 80 to 130 degrees of elbow flexion.
- Control: No training.
After five weeks, the bottom-half group gained more than twice as much muscle thickness as the top-half group. That supports the idea that the lengthened portion of the preacher curl is particularly useful for hypertrophy.
Importantly, this comparison was between two partial ranges of motion. It does not establish that bottom-half preacher curls are superior to full-range preacher curls. It does, however, give us a good reason not to neglect the stretched portion.
The authors also discussed other research supporting the importance of training muscles at longer lengths, which is why stretched-position work appears more than once in this session.
I prefer doing these one arm at a time. Start with your weaker arm, then match its reps with your stronger arm. That helps prevent small asymmetries from developing and lets you focus on the stretch and tension in one biceps at a time.
Putting the Pull Day Together
This workout combines several different training priorities: controlled failure work on pulldowns, grip and angle variation for the back, heavier progressive overload for the biceps, and lengthened-position work to finish.
The goal is not simply to make every exercise harder. It is to give each exercise a clear job. Keep the pulldowns consistent, squeeze through your rows, control your negatives, and track your curl performance so you have something concrete to improve.
If you want the complete plan, my Ultimate Push Pull Legs System organizes 12 weeks of training across three distinct phases. It includes four-day, five-day, and six-day-per-week versions so you can choose the schedule that fits your availability.
|


