A good push workout needs more than a few presses and a triceps finisher. Exercise selection matters, but so do the order of the movements, the way you structure your sets, and how you balance progressive overload with controlled, targeted work.
This chest, shoulders, and triceps workout brings those pieces together with seven exercises. You can use it as a complete push day or borrow individual movements for your own split. Just keep the context in mind: this is my second push day of the week, designed to complement a different first push session rather than cover every possible training priority on its own.
Table of Contents
- Key Takeaways
- The Push Workout at a Glance
- Warm Up Before You Start Pressing
- 1. Close-Grip Barbell Incline Bench Press
- 2. Machine Shoulder Press
- 3. Floor Reset Skull Crusher
- 4. Bent-Over Cable Pec Fly
- 5. Machine Lateral Raise With a Tempo Change
- 6. Plate Front Raise With Rotation
- 7. Diamond Push-Up Finisher
- How This Fits Into a Push Pull Legs Program
Key Takeaways
- Use this seven-exercise session as a second push day that complements your other weekly pressing workout.
- Structure incline pressing with moderate, heavy, and lighter sets to combine technique practice, overload, and focused work.
- Use machines to add demanding shoulder volume without as much whole-body fatigue.
- Keep your technique controlled as effort rises, including during the final diamond push-up set to failure.
The Push Workout at a Glance
- Close-grip barbell incline bench press: 3 working sets, performing 8, 5, and 15 reps.
- Machine shoulder press: 3 sets of 10 to 12 reps.
- Floor reset skull crusher: 3 sets of 6 to 8 reps.
- Bent-over cable pec fly: 3 sets of 10 to 12 reps.
- Machine lateral raise: 3 sets of 20 reps, with two different tempos within each set.
- Plate front raise with rotation: 2 sets of 15 to 20 reps.
- Diamond push-up: 1 set to failure, completing as many controlled reps as possible.
These are working sets. Before the first exercise, take the time to warm up generally and then build up to your working weight.
Warm Up Before You Start Pressing
Start with five minutes on a treadmill or StairMaster, followed by a few quick dynamic movements such as arm swings and cable external rotations.
Then perform a short warm-up pyramid on the incline bench press. An example is:
- An empty bar for 10 reps.
- About 50% of your working weight for 4 reps.
- About 75% of your working weight for 3 reps.
The goal is to arrive at your first working set ready to press, not already fatigued from your warm-up.
1. Close-Grip Barbell Incline Bench Press
Prescription: 3 working sets of 8, 5, and 15 reps, respectively.
This is a slightly unusual, undulating set structure. Instead of keeping the same rep target across all three sets, each set has a different job:
- Set 1: 8 reps with a moderate weight. Find your groove and assess how strong you feel.
- Set 2: 5 reps with a heavier weight. Make this your main heavy overloading set.
- Set 3: 15 reps with a lighter weight. Finish with smooth reps, a good pump, and more attention to the mind-muscle connection.
Incline bench pressing isn't a completely dialed-in movement for everyone. Opening with eight reps gives you a chance to lock in your technique before handling the heavier set of five. It also gives you useful feedback about how much weight to add.
Rest at least three to four minutes between the first two working sets. You want your pecs recovered enough to increase the load, rather than turning the heavier set into a test of how well you tolerate fatigue.
After that heavy set, the main overloading work is done. Reduce the weight for the final 15 reps and focus on moving well. This isn't a set structure I use everywhere, but it fits this exercise nicely.
Why Prioritize the Incline Press?
An eight-week study comparing flat and incline bench pressing found no significant difference between the groups in mid-pec or lower-pec growth, but significantly greater upper-pec growth in the incline group.
That supports prioritizing incline pressing when upper-chest development is a goal. It does not establish that incline bench pressing is universally the better chest exercise.
There are important limitations: this was one study involving 47 untrained participants. The unusually large amount of muscle growth reported has also attracted criticism. I still think it provides useful support for incline pressing, but I wouldn't make sweeping claims from it.
Grip, Touch Point, and Bar Path
Use a grip just outside shoulder width. The slightly closer grip is intended to further emphasize the upper pecs.
Lower the bar toward a high contact point on your upper chest, then press straight up or up and slightly back. A common mistake is touching too low and pressing the bar out in front of the body.
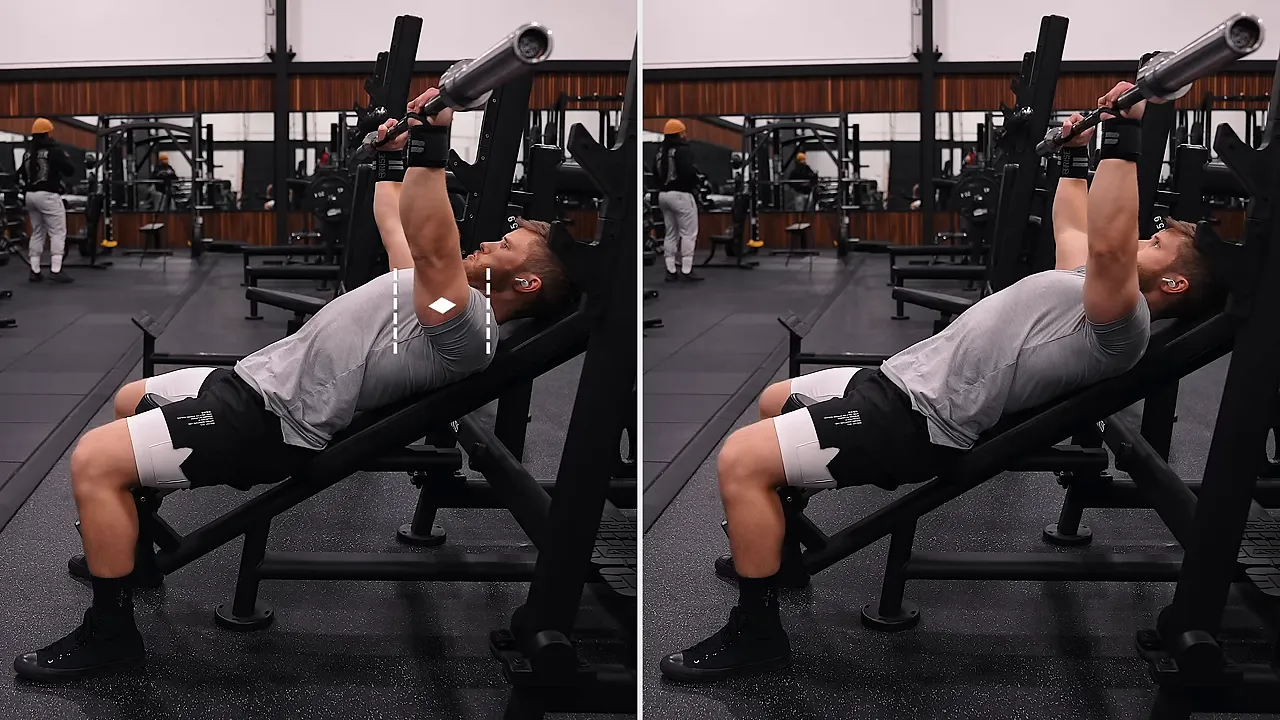
Think about keeping the bar approximately aligned over the shoulder joint. Letting it drift too far forward can limit the load you can press and may place more strain on your shoulders.
I use a slight elbow tuck while lowering, then allow the elbows to flare somewhat as I press. There is a reasonable range of acceptable elbow positions, so don't force one exact angle. Find a modest degree of tuck that feels comfortable and lets you press consistently.
2. Machine Shoulder Press
Prescription: 3 sets of 10 to 12 reps.
The incline press has already trained the delts fairly hard. Now I want more direct shoulder volume without making the workout unnecessarily taxing overall. That's why I use a machine here.
A machine press generally requires less stabilization and tends to be less fatiguing to the body as a whole. It also makes it easier to push close to failure without worrying about dropping a free weight.
Machines won't challenge every smaller stabilizing muscle to the same extent as free weights. But when your program already includes free-weight exercises, I don't see that as a compelling reason to avoid them.
Use a Deep Enough Range of Motion
Adjust the seat so your upper arms can reach at least parallel to the floor at the bottom. I prefer going a little below parallel to get a deeper stretch rather than cutting the movement short.
I also use a thumbless grip on this machine because it helps me feel my delts working. That's a personal preference, not a requirement for an effective shoulder press.
Keep the cadence smooth, roughly one second up and one second down. I stop just short of fully locking out to maintain continuous movement and keep my attention on the shoulders.
Constant tension isn't magic. I use it here because it helps my focus, not because avoiding lockout has some special muscle-building property.
How Close to Failure?
- Sets 1 and 2: Stop with about one rep left in the tank, approximately RPE 9.
- Set 3: Continue to failure, meaning you cannot complete another lifting phase.
This lets you accumulate hard shoulder work while saving the most demanding effort for the final set.
3. Floor Reset Skull Crusher
Prescription: 3 sets of 6 to 8 reps.
This is the first triceps-dominant movement, and it's more strength-focused than the cable triceps work I use on my other push day.
The emphasis here is on moving a heavier load and progressively increasing performance. You're still training for muscle growth, but the immediate focus is less about chasing a particular sensation and more about improving your weight and reps.
How to Perform the Floor Reset
- Lie on the floor with the bar positioned behind your head.
- Extend your elbows to lift the weight, reaching full or nearly full extension.
- Keep the bar behind your eye line at the top rather than bringing it directly over your face.
- Lower the weight back to the floor and allow it to come to a complete stop before the next rep.
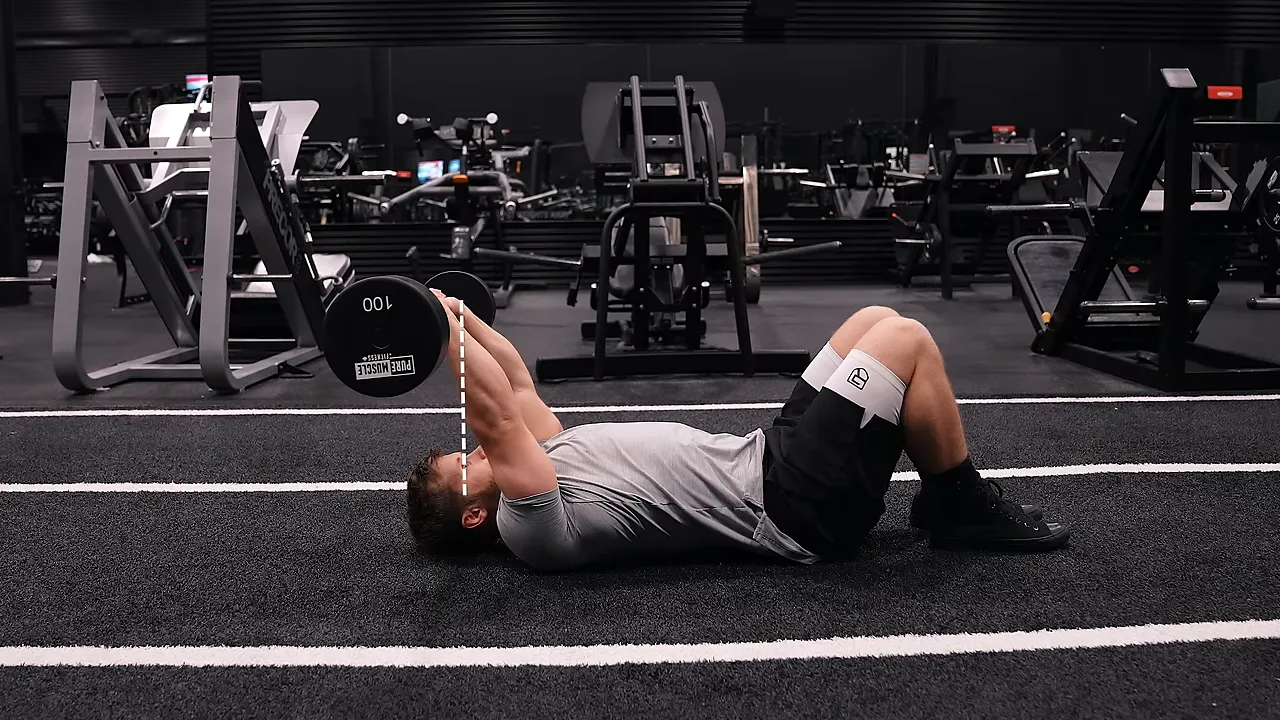
For the strength-focused version, I control at least the first half of the lowering phase, then let the plates settle to the floor more quickly, somewhat like resetting a deadlift. I may also let the bar roll slightly away and back before initiating the next rep.
That's a specific strength-oriented technique, not a requirement. If your priority is purely hypertrophy, resist the weight and control the entire lowering phase to the floor.
Once you're comfortable with the movement, the load may be a little heavier than what you normally use for conventional skull crushers. Track your weight and reps, and aim to improve one or the other from week to week.
If this style is new to you, your performance may improve quickly as you learn it. The idea is to build triceps strength that you can then bring back to your conventional skull crusher technique.
4. Bent-Over Cable Pec Fly
Prescription: 3 sets of 10 to 12 reps.
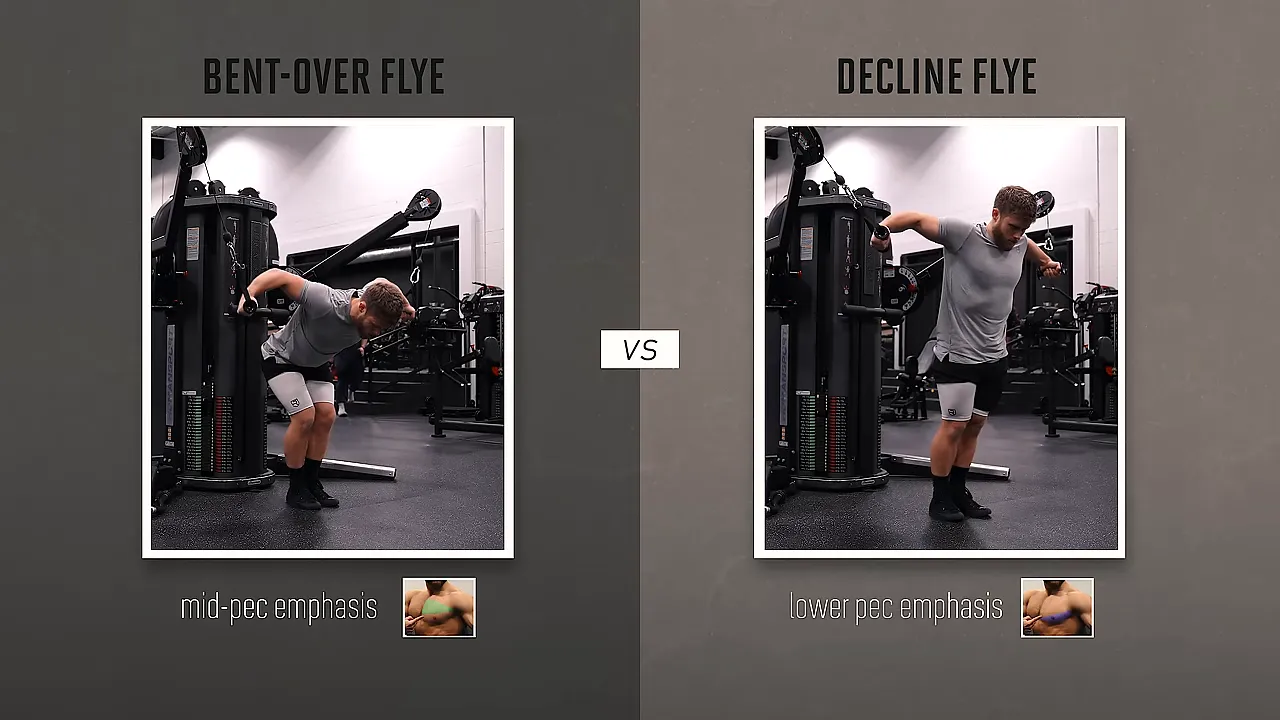
For this fly variation, hinge forward at the hips and bring your hands together in a downward motion toward the floor.
That may sound like a decline cable fly, but the position of your torso changes what the movement actually is.
- Decline cable fly: Your torso stays relatively upright while your arms converge downward, emphasizing the lower pecs.
- Bent-over cable fly: Your torso is angled forward, and your arms fly out in front of your chest relative to that torso position.
The bent-over version should train the pec regions relatively evenly, probably with the greatest emphasis on the mid pecs. It's essentially a mid-height cable fly performed with your body tipped forward.
Why Bend Forward?
On a conventional standing cable fly, the cables can pull you backward. If you spend the set fighting to keep your balance, that instability may limit how much tension you can direct onto your pecs.
Leaning forward over the cables gives you a more grounded position. Your body weight helps you resist the pull, allowing you to focus more on bringing your arms together through the chest.
If a standing cable fly always feels like a balancing exercise, try this setup and see whether your pecs become the clearer limiting factor.
5. Machine Lateral Raise With a Tempo Change
Prescription: 3 sets of 20 reps.
Each set has two parts, performed continuously:
- Reps 1 through 5: Lower the weight slowly, taking about five seconds on each negative.
- Reps 6 through 20: Switch to a smooth cadence of about one second up and one second down, without pausing at either end.
The first five slow negatives are there to help you find your side delts. Pay attention to those fibers working as you resist the lowering phase.
Once that connection feels established, keep it while moving into the final 15 standard-tempo reps.
Again, there isn't anything inherently special about this exact rep pattern. I find it useful for people who struggle to feel their side delts on lateral raises. It's a way to get locked into the target muscle before pushing through the rest of the set.
6. Plate Front Raise With Rotation
Prescription: 2 sets of 15 to 20 reps.
Normally, I'm not a huge fan of front raises. The front delts already receive plenty of work from horizontal and vertical pressing, and they often aren't the part of the shoulder that needs more attention relative to the side delts.
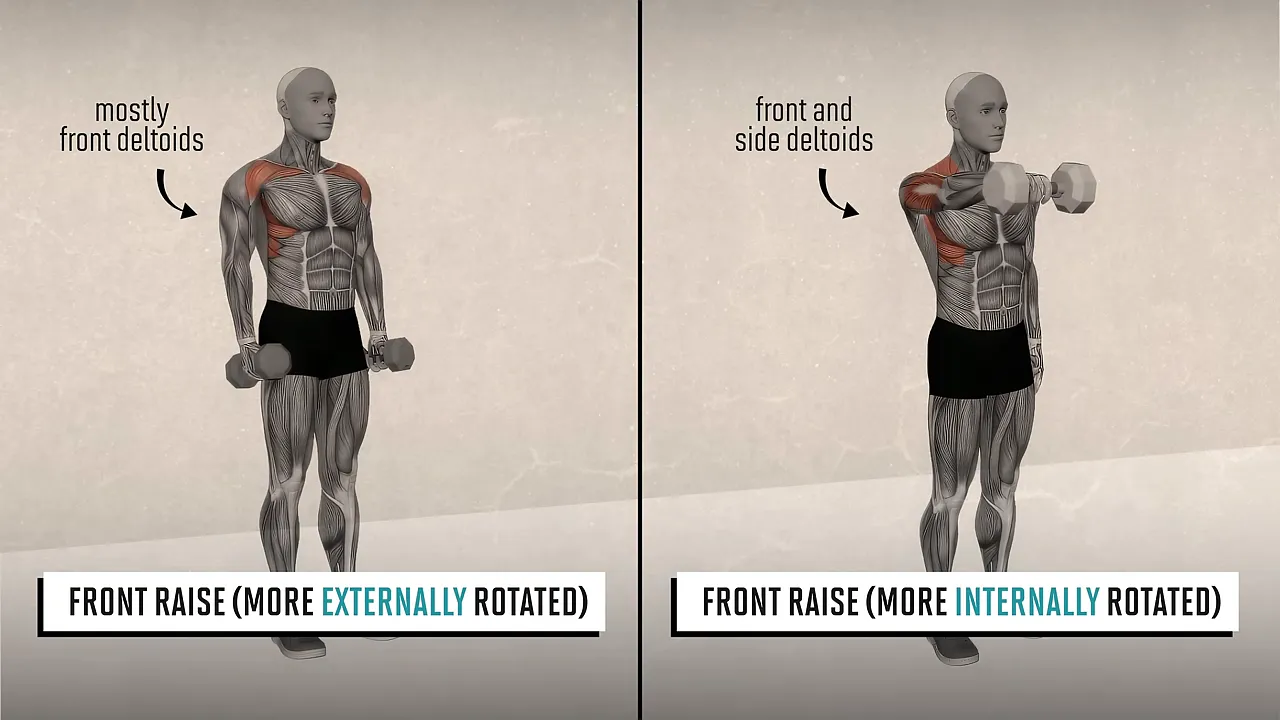
But this version modifies the movement. As you raise the plate, rotate it as though you're steering a wheel. The goal is to involve more of the deltoid fibers between the front and side regions rather than making it just another front-delt exercise.
What the Rotation Changes
With a more externally rotated arm position, the front-delt fibers line up well with the direction of resistance, while the side-delt fibers are positioned less favorably.
Internally rotating the shoulder changes that alignment, putting the side-delt fibers in a better position to contribute to the front raise. That's the reasoning behind the steering motion.
I include a little more shoulder work because, in my experience, the delts can tolerate a fairly high amount of volume. From a bodybuilding standpoint, they're also important for building an X-frame physique.
However, if this variation causes shoulder pain, swap it for a dumbbell Y raise. Internal rotation is a normal movement for healthy shoulders, but that doesn't mean you need to force an exercise that doesn't feel right for you.
7. Diamond Push-Up Finisher
Prescription: 1 all-out set to failure, completing as many controlled reps as possible.
I like finishing with an AMRAP set, meaning as many reps as possible, because there are no remaining exercises for that fatigue to interfere with. You can put everything into the set and finish knowing you worked hard.
Bring your hands close together, with the thumbs and index fingers forming a diamond shape.
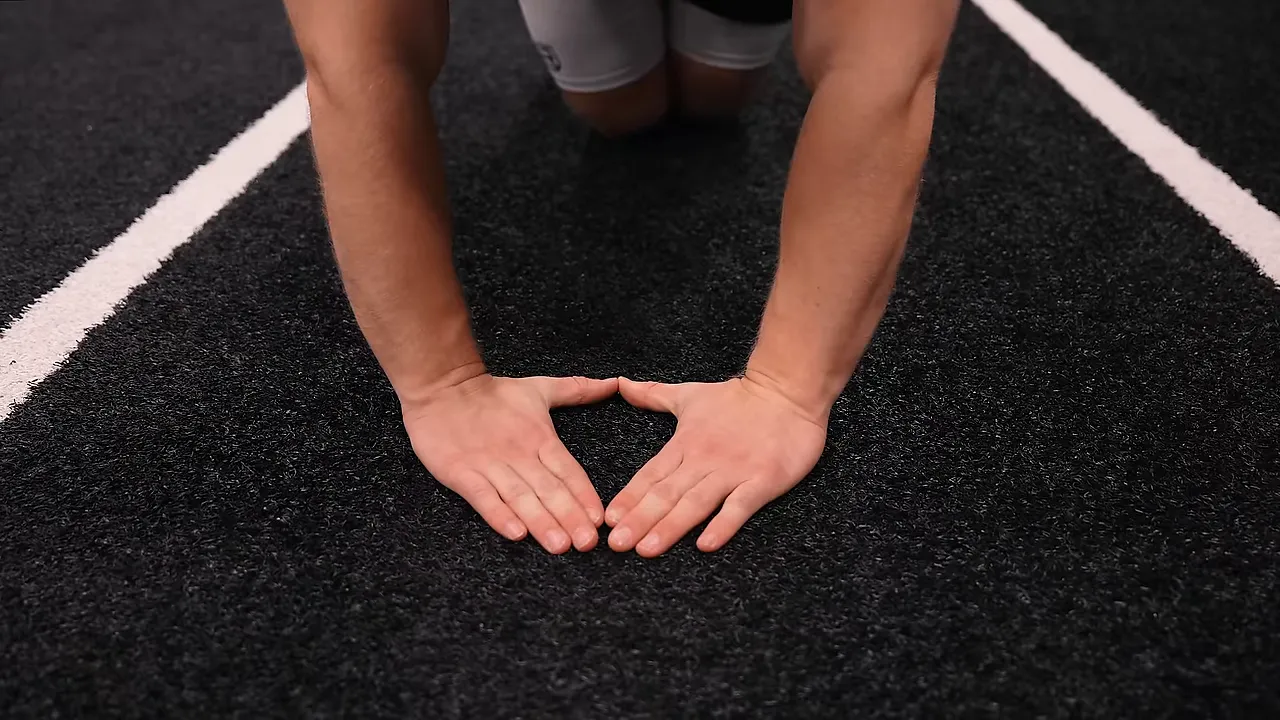
The narrow hand position places greater emphasis on the triceps than a conventional push-up. The narrower base of support also makes the movement more challenging overall.
Don't worry if your rep count is much lower than your usual push-up number. I completed 21 reps here, even though I could probably do 60 or 70 conventional push-ups when fresh. These are tough, especially at the end of a workout.
Control the descent instead of dropping toward the floor. The point isn't simply to produce the largest possible number. It's to practice keeping your technique consistent as you approach failure.
How This Fits Into a Push Pull Legs Program
This session is designed to complement my first push-day workout. For example, the heavier floor reset skull crusher here balances the higher-rep cable triceps movement on the other day.
That weekly context matters. If an exercise or emphasis seems absent from this session, it may already be covered in the other push workout. You don't need every individual workout to do everything.
The full Ultimate Push Pull Legs System organizes the training into three phases:
- Phase 1, six weeks: The opening workouts, including this push session.
- Phase 2, four weeks: Different exercises, rep ranges, and set volumes, using a lower-volume, higher-intensity approach.
- Phase 3, two weeks: A short phase with very high-rep sets and substantially more volume.
A full deload week follows those 12 training weeks. You can then repeat the program while you continue making progress.
The system includes an ebook explaining the methods, an Excel spreadsheet, exercise demonstrations, and coaching cues for every exercise. It's designed for intermediate to advanced trainees. If you're still in your first year or two of lifting, my Fundamentals program is the more appropriate starting point.
Whether you follow the whole session or borrow a few movements, keep the main distinction clear: push the load where progressive overload is the priority, and use controlled, focused execution where the goal is targeted muscle work. Both have a place in a productive push workout.
|


