Doing the same few exercises every week isn't a problem. But if your workouts are starting to feel stale, a good variation can make training more enjoyable while giving you a different way to challenge a muscle.
These seven exercises aren't novelty moves for the sake of looking different. They're movements I personally use every week, with practical benefits and biomechanical reasoning behind them. Some are familiar. Others look a little wild until you understand what they're doing.
Just keep the big picture in mind: training hard and staying consistent matter more than finding the perfect exercise. These are useful tools, not mandatory replacements for the basics.
Key Takeaways
- Hard training and consistency matter more than choosing unusual or supposedly perfect exercises.
- Exercise variations can change resistance, improve stability, or add a missing stretched position.
- Build toward full dragon flags using lying leg raises and bent-knee progressions.
- Kelso shrugs and seated cable deadlifts offer targeted work with less demand on other muscles.
Table of Contents
- 1. Dead Hang: A Simple Test of Grip Strength and Endurance
- 2. Zottman Hammer Curl: Make the Lowering Phase More Challenging
- 3. Incline Dumbbell Y Raise: A Different Feel for Your Side Delts
- 4. Side-Facing Rear Delt Fly: Add the Cross-Body Stretch
- 5. Dragon Flag: A Seriously Challenging Ab Exercise
- 6. Kelso Shrug: Target Your Midback Without Turning It Into a Row
- 7. Seated Cable Deadlift: A Stable Glute and Hamstring Option
- Keep the Basics, Use Variations With a Purpose
- Support Your Training With a Nutrition Plan
1. Dead Hang: A Simple Test of Grip Strength and Endurance
A dead hang is exactly what it sounds like: grab a pull-up bar and hang from it. It's simple, but it challenges your grip, forearms, core, and muscular endurance. I also find it useful for relieving stiffness around my shoulders and back.
I recently coached my friend through a challenge where he earned $1,000 for every second he could hang. His starting point was just six seconds. After 30 days, he reached 60 seconds and earned $60,000. When I tested myself, I managed two minutes and 45 seconds.
That puts me in the advanced category on the rough scale I use:
- Beginner: 10 to 60 seconds.
- Intermediate: One to two minutes.
- Advanced: Two to three minutes.
- Elite: Three to four minutes.
- World class: More than four minutes.
Why I like dead hangs
Hanging can create a stretch around the shoulder joint that may help some people feel less stiff and more comfortable. It also provides traction through the spine, which I personally find relieving after heavy squats or deadlifts, or after sitting for a long time.
The evidence on spinal decompression is mixed, though. My experience of relief isn't proof that hanging treats a back or shoulder condition. Treat it as an exercise to assess for yourself, not a guaranteed fix for pain.
How to do a dead hang
- Chalk your hands. Liquid chalk is an inexpensive option if your gym doesn't provide it, and it can make a big difference.
- Use a bench to reach the bar if needed, and take a grip just outside shoulder width.
- Start with only as much grip pressure as you need to stay secure. As you begin to slip, squeeze harder rather than exhausting your forearms immediately.
- Let your legs hang straight down. Keeping your feet together and toes pointed down can help reduce swinging.
- Maintain a steady breathing rhythm instead of holding your breath.
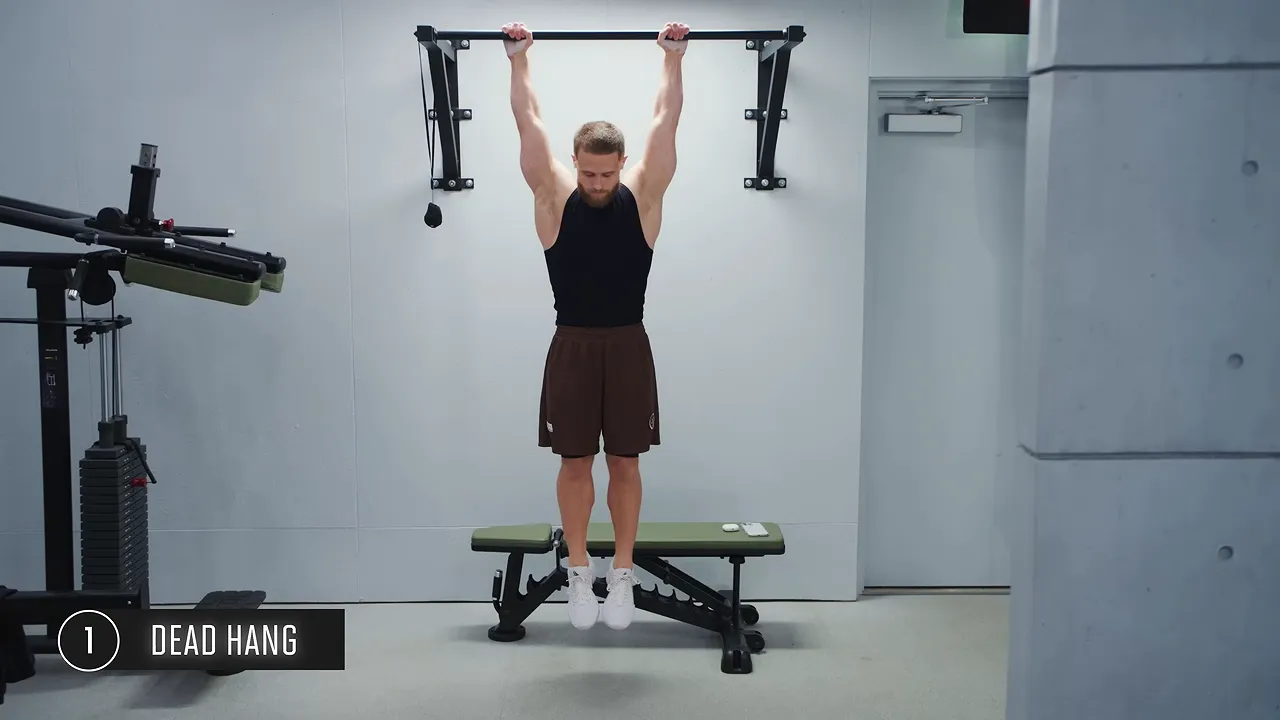
Your core strategy depends on the goal. For a maximum-time attempt, brace enough to stay stable without flexing so hard that you wear yourself out. For a gentle decompression stretch, begin braced, then gradually let your hips sink and your torso lengthen.
If a full bodyweight hang is too difficult, loop a resistance band around the bar and step into it for assistance, or use an assisted pull-up machine.
2. Zottman Hammer Curl: Make the Lowering Phase More Challenging
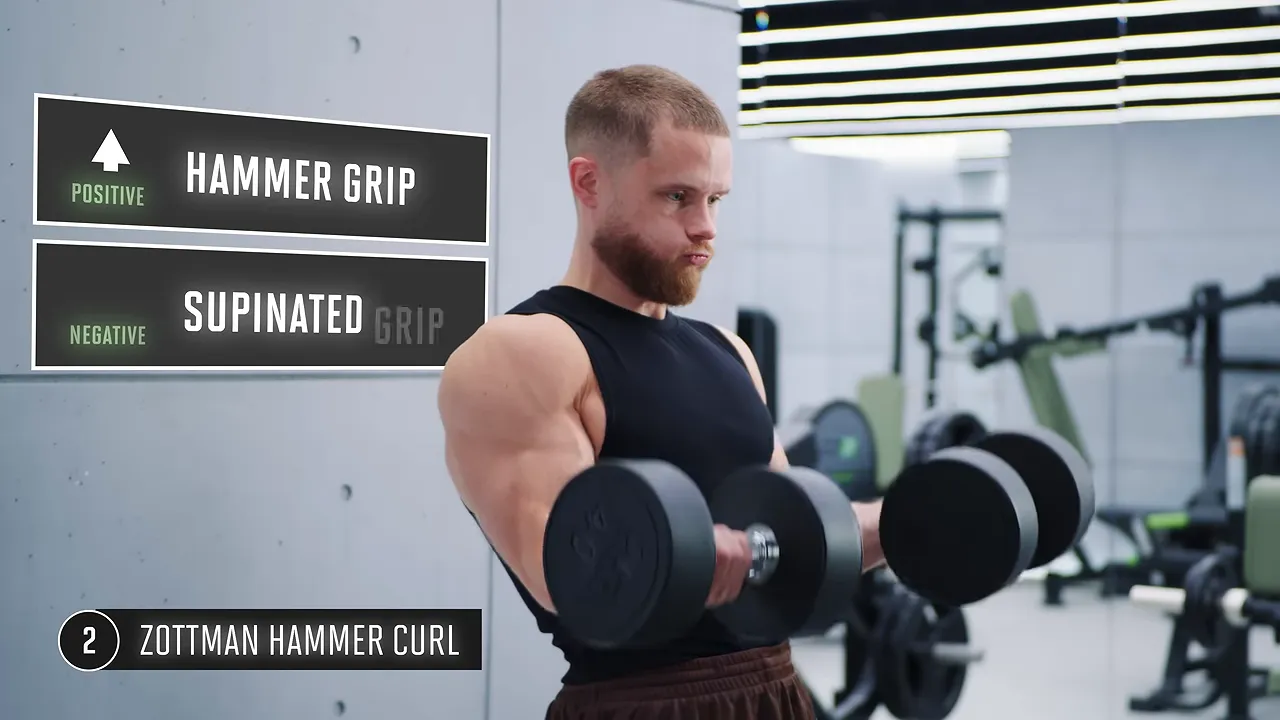
This is my modification of a curl named after nineteenth-century strongman George Zottman. The idea is straightforward: curl up with a hammer grip, then lower with your palms facing up.
Why change grips halfway through? You're generally stronger during the eccentric, or lowering phase, than during the concentric, or lifting phase. That difference can be around 40 to 50 percent, so a weight that challenges you on the way up may leave plenty in reserve on the way down.
You could ask a partner to push down on the dumbbell during the negative, but that's awkward. Changing your grip is a more practical way to alter how the load is distributed.
The neutral hammer grip lets the brachialis and brachioradialis contribute strongly as you lift. Rotating into a supinated, palms-up position changes the emphasis toward the biceps during the descent. It doesn't literally make the dumbbell heavier, but it can make the negative more challenging for the muscle you're trying to target.
How to do a Zottman hammer curl
- Hold each dumbbell in the middle of the handle rather than resting your thumb against the dumbbell head.
- Curl upward with your palms facing each other.
- Stop just before your forearms become vertical.
- Rotate your palms upward, then lower under control through a wide arc.
- At the bottom, rotate back into the hammer grip and repeat.
I usually do these for eight to 10 reps.
I don't expect this variation to add inches to your arms compared with standard dumbbell curls. I just think it makes biomechanical sense and feels effective. If you prefer regular curls, they're still excellent. Giving the negative a slower, more controlled descent is another way to make that part of the rep more demanding.
3. Incline Dumbbell Y Raise: A Different Feel for Your Side Delts
I've been doing incline dumbbell Y raises every week, and they've become one of my favorite shoulder exercises.
With a standing dumbbell lateral raise, gravity pulls straight down. When your arms hang by your sides, the dumbbells create very little turning force at the shoulder. The challenge increases as you lift, reaching its highest point around the top.
That doesn't make standing lateral raises bad. A preprint comparing dumbbell and cable lateral raises found that both could produce similar side-delt growth. You can absolutely build your shoulders with standard dumbbell laterals if you train them hard.
I just don't love how uneven the resistance feels. Reclining on a bench changes the relationship between your torso, arms, and gravity, giving the exercise a different feel through the range of motion.
How to do an incline dumbbell Y raise
- Set a bench to roughly a 20 to 30 degree incline. You should feel like you're leaning fairly far back.
- Brace your upper back against the pad and lift your chest.
- Start with the dumbbells at your sides.
- Lift your arms up and out into a Y shape, slightly forward of a straight lateral raise.
- Lower under control, stopping when the dumbbells return to your sides.
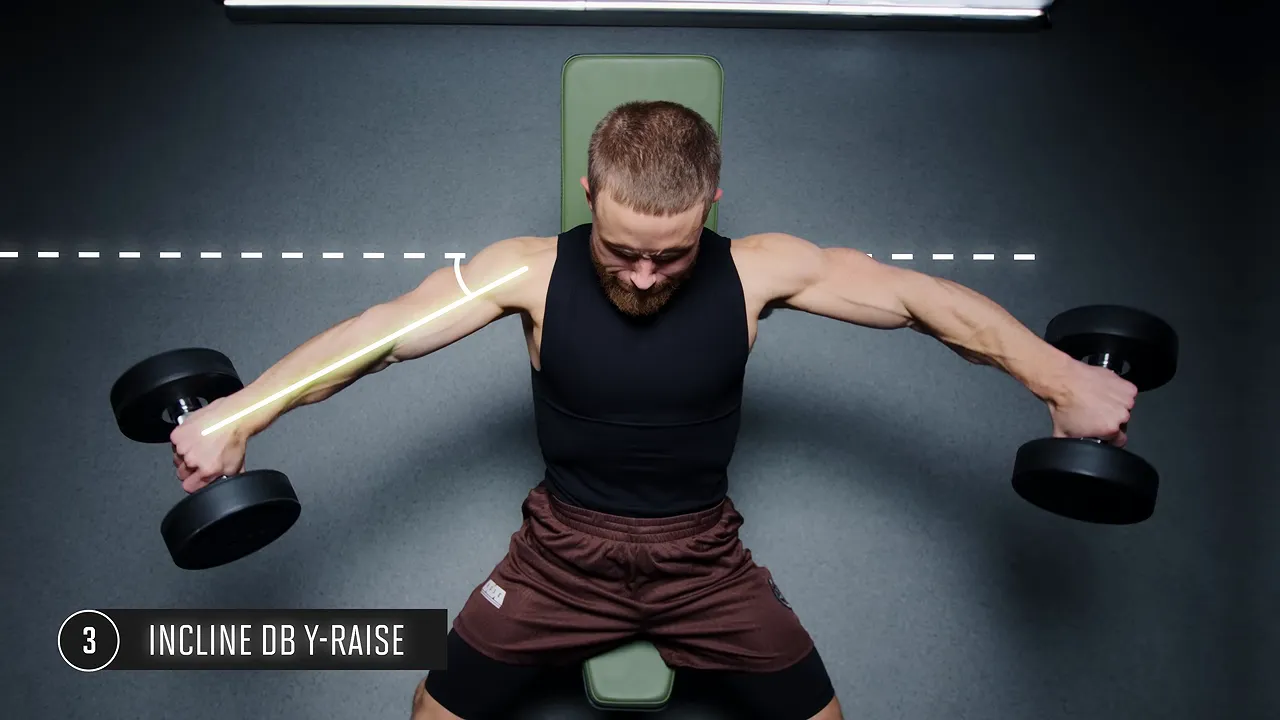
Don't let the dumbbells swing behind your sides until your arms hang vertically. That takes you back toward a position with very little resistance at the shoulder.
I think about squeezing the side-delt fibers together on the way up, then feeling them lengthen on the way down. The slightly forward arm path also works the region between the front and side heads, which can contribute to shoulder shape from the front.
Lifting straight out to the sides is generally safe, but many people find the scapular plane, about 30 degrees forward, more comfortable. That's another reason this variation is worth trying.
4. Side-Facing Rear Delt Fly: Add the Cross-Body Stretch
The reverse pec deck is a great example of how a small setup change can make a meaningful difference.
In the traditional position, facing the chest pad, you mainly work through the middle and shortened portions of the rear delts' range. To reach a more lengthened position, your working arm needs to travel farther across your body.
That's why I turn sideways and train one arm at a time. The point isn't to make the exercise look unusual. It's to include the stretched portion that the standard setup largely misses.
How to do a side-facing rear delt fly
- Sit sideways on the pec deck rather than facing the chest pad.
- Reach across your body to take the handle with your working arm.
- Sweep the arm outward in a broad arc.
- Control the return and reach across your body again.
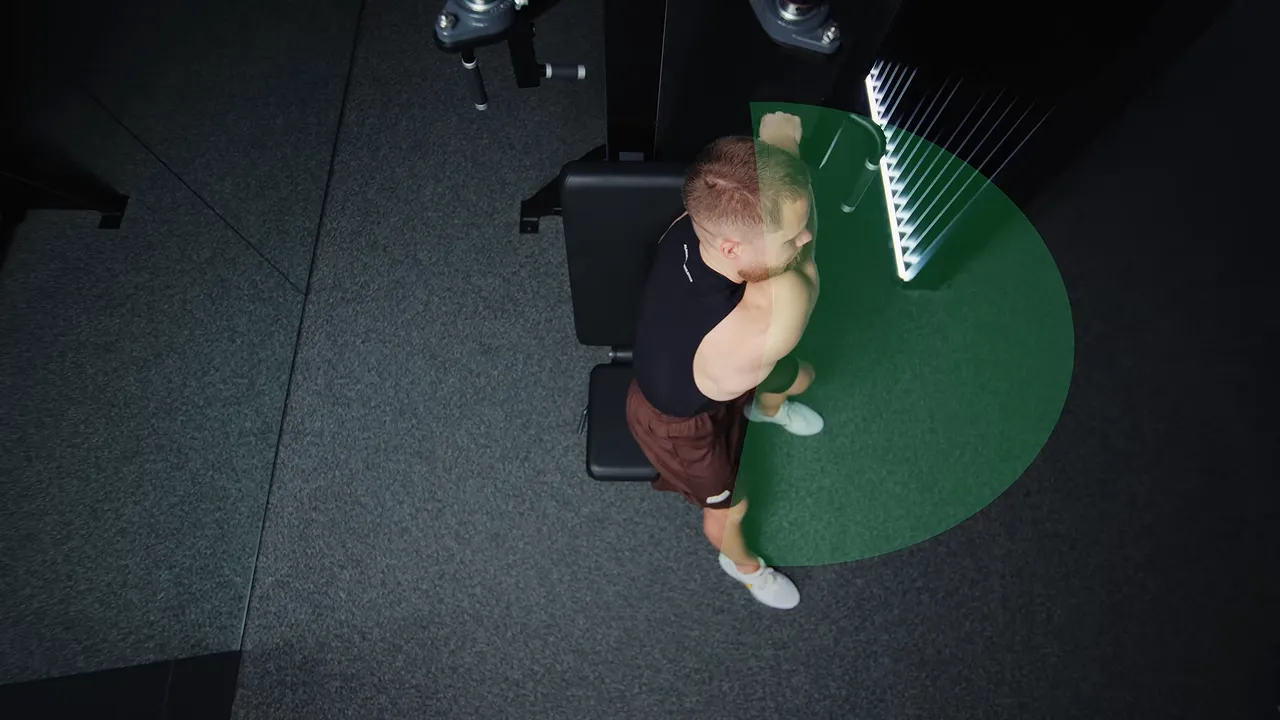
A cue I picked up from Dr. Mike is to imagine a pile of money spread across the floor. The more ground you cover with your arm, the more money you get to keep. That encourages a wide sweeping motion instead of yanking the handle backward with your back and biceps.
You don't need to twist all the way around. Keep the movement focused on the rear delt.
Alternatives without a pec deck
- Cables: Use a rear delt fly setup that allows your arms to reach across your body on the return.
- Dumbbells: Lie on your side on a bench, let the working arm stretch across your body, then lift the dumbbell back up.
A deep stretch isn't going to suddenly double your gains. But if every rear delt exercise you do skips the lengthened position, I think it's worth including one that doesn't.
5. Dragon Flag: A Seriously Challenging Ab Exercise
Dragon flags are a classic associated with Bruce Lee, and they're a lot harder than they look.
Your lower abs work hard as you raise your legs and pelvis, but this isn't only a lower-ab exercise. Your entire abdominal wall has to contract to keep your torso rigid and resist your lower back arching. The obliques help stabilize you, while the serratus and lats contribute to anchoring your upper body.
The first time I tried them, my upper abs stayed sore for about five or six days. Fair warning: ease into these.
How to do a dragon flag
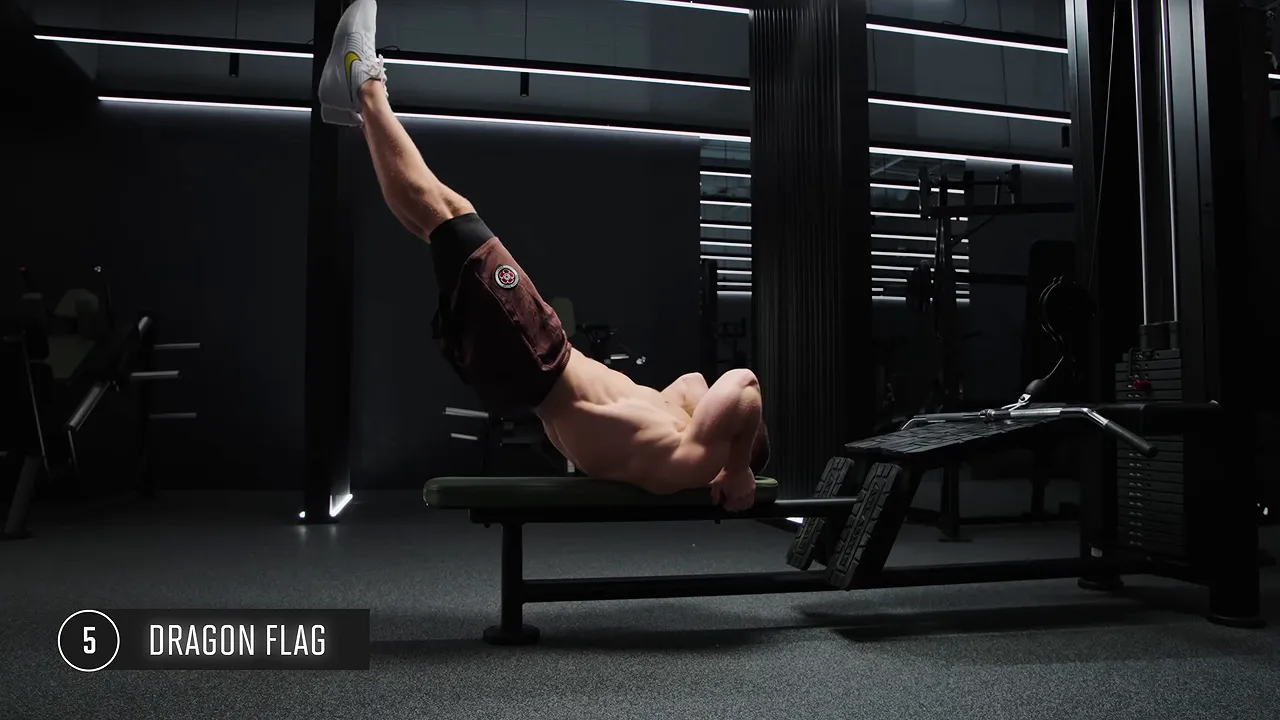
- Lie on a bench and grip a secure support behind your head.
- Keep your hips and knees straight.
- Raise your legs, hips, and glutes off the bench as one unit until your body reaches roughly a 60 to 80 degree angle to the bench.
- Lower under control without folding at the hips or losing your rigid torso position.
- Repeat for approximately four to eight controlled reps, or however many you can perform well.
Build up with these progressions
- Lying leg raise: Lie flat, brace your core, and raise your legs. Build to eight to 10 controlled reps.
- Bent-knee dragon flag: Lift your hips and torso with your knees bent. The shorter lever makes the exercise substantially easier. Build to eight to 10 reps.
- Full dragon flag: Gradually introduce the straight-leg version once the bent-knee variation is manageable.
I've been favoring dragon flags over hanging leg raises lately because the bench gives my upper body a stable anchor. Hanging leg raises can turn into a battle against swinging, which limits how effectively I can direct tension into my abs.
A Roman chair solves much of the swinging problem, but your arms, shoulders, and back still have to support your bodyweight. Dragon flags offer another way to challenge the abs without that same support demand.
Ab training and ab visibility are different goals
Hard ab training builds the muscle, but nutrition plays a huge role in how visible it becomes. As rough reference points, visible abs often require body-fat levels around 10 to 12 percent for males and around 20 percent for females. Those aren't exact thresholds for every person.
6. Kelso Shrug: Target Your Midback Without Turning It Into a Row
Despite the name, the Kelso shrug has more in common with the shoulder-blade portion of a row than with a conventional upward shrug.
During a normal row, you bend your elbows, move your upper arms, and squeeze your shoulder blades together. During a Kelso shrug, your elbows stay straight while your shoulder blades move apart and together.
That makes it a useful way to emphasize the middle traps and rhomboids without involving the biceps in elbow flexion. Using chest support also reduces the demand on your lower back.
Why remove the arm movement?
Rows are fantastic overall back builders, but several muscles contribute to each rep. If your biceps or rear delts become the limiting factor, your midback may still have work left to give.
That's why you might reach failure on a normal row and still manage another four or five Kelso shrugs. It doesn't mean rows are ineffective. It means reaching failure in a compound movement doesn't guarantee every contributing muscle has reached its limit.
Rows can grow your biceps, too, but they're not a substitute for direct curls if biceps growth is the priority. In one study comparing rows and curls, curls produced roughly twice the biceps growth.
How to do a Kelso shrug
- Set up on a chest-supported T-bar row machine.
- Brace your chest against the pad and take a fairly wide grip, around 1.5 times shoulder width.
- Unrack the weight and keep your elbows straight.
- Squeeze your shoulder blades together as hard as you can.
- Pause for about one second, then let your shoulder blades spread apart under control.
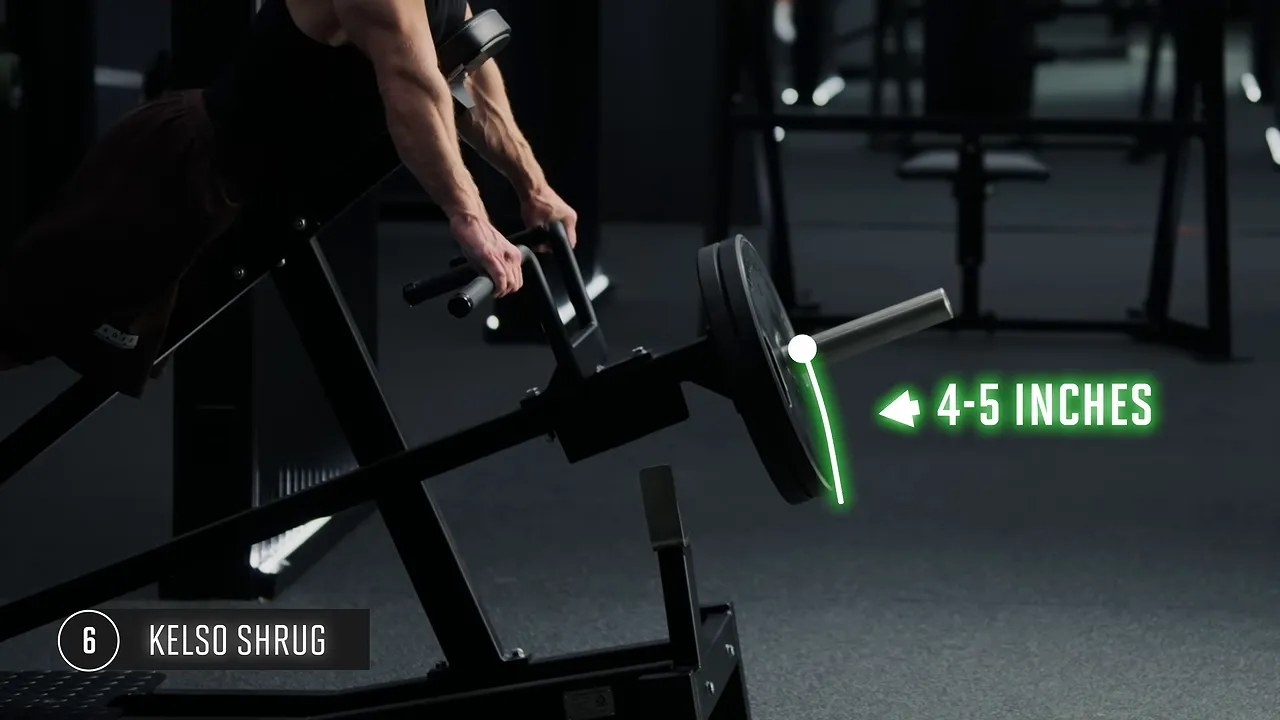
The short range of motion can feel strange at first. But once you remove elbow bending and most upper-arm movement, this is what the available shoulder-blade motion looks like.
No T-bar machine? Brace your chest against an incline bench and do the same movement with dumbbells. I still use regular rows, but for specifically targeting midback thickness, Kelso shrugs are one of my go-to options.
7. Seated Cable Deadlift: A Stable Glute and Hamstring Option
This is probably the least familiar exercise on the list. Yes, it looks a little gimmicky. But there's a good reason I use it.
Barbell deadlifts are excellent for total-body strength, and I personally do barbell Romanian deadlifts every week. Sometimes, though, I want extra glute and hamstring work without the same overall fatigue cost.
The seated cable deadlift gives me a stable setup with my glutes planted on the bench. I find it easier to recover from, and I can connect with my glutes and hamstrings really well.
How to do a seated cable deadlift
- Set up at a seated cable station with a wide bar attachment, gripping just outside shoulder width.
- Plant your feet on the platform with your toes turned slightly outward.
- Keep your chest tall, bring the weight into position, and extend your hips to establish the top position.
- Keep your glutes planted in that same spot throughout the set.
- Begin the rep by flexing your hips and allowing your knees to bend, keeping the bar close to your body.
- Lower as far as you comfortably can without rounding your lower back. For me, the bar reaches around my ankles.
- Squeeze your glutes to extend your hips and return to the top, keeping your chest up and shoulders back.
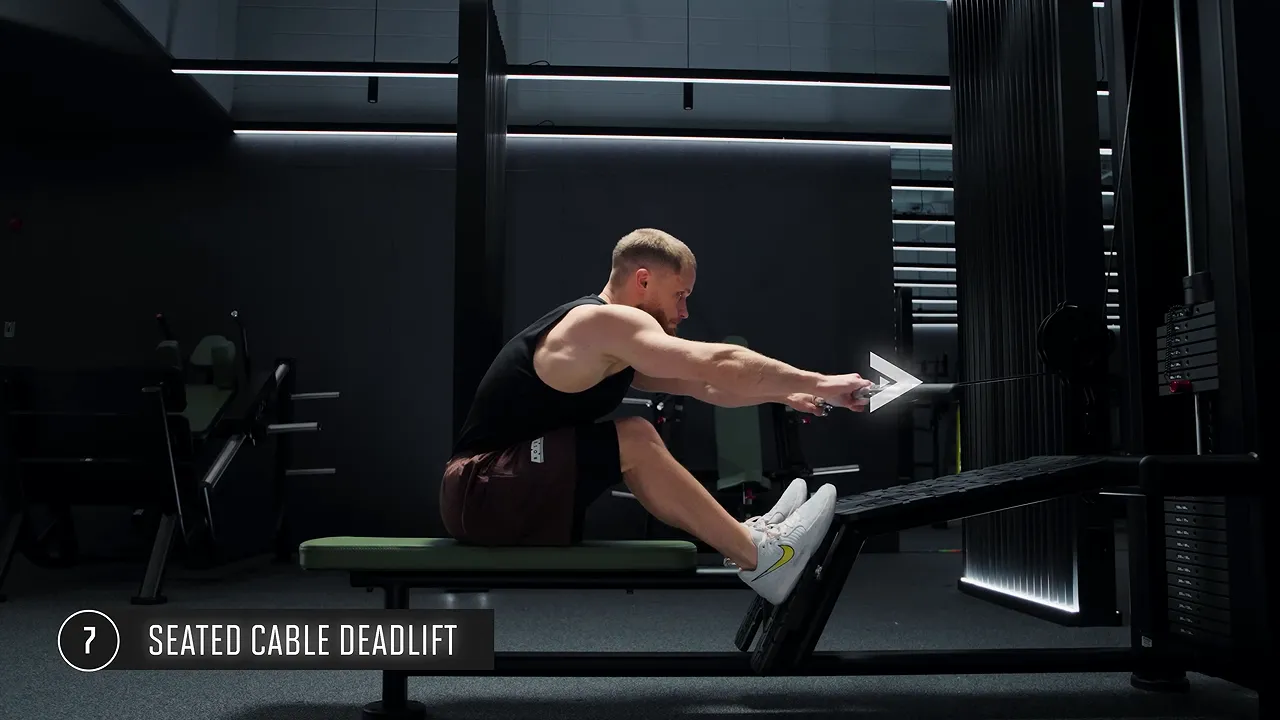
Unlike a barbell deadlift from the floor, there aren't weight plates stopping the descent, so you can explore a larger range of motion. But your ability to maintain your lower-back position sets the limit, not how far the cable lets you reach.
Also, this is a deadlift, not a row. Don't bend your elbows and yank the bar toward you. Use hip extension to move the load. I find that deliberately squeezing my glutes at the top helps keep the exercise focused where I want it.
Two variations worth trying
- Romanian deadlift style: Keep your knees straighter to shift more emphasis toward the hamstrings.
- Single-leg style: Train one side at a time without the balance challenge of a free-weight single-leg deadlift.
For the single-leg version, start with your weaker side, take it to or close to failure, then match that number of reps with your stronger side.
I don't think seated cable deadlifts are better than barbell deadlifts. They're a different tool: stable, easier for me to recover from, and useful when I want targeted posterior-chain work without another heavy barbell lift.
Keep the Basics, Use Variations With a Purpose
The common thread here isn't obscurity. Each exercise solves a particular problem: a grip challenge, an underchallenged negative, an uncomfortable arm path, a missing stretch, instability, or fatigue from muscles other than the ones you're trying to target.
You don't need to rebuild your routine around all seven. Keep the exercises that are working, and use these variations where their specific benefits fit your training. A useful exercise is one you can perform well, train hard, and recover from consistently.
Support Your Training With a Nutrition Plan
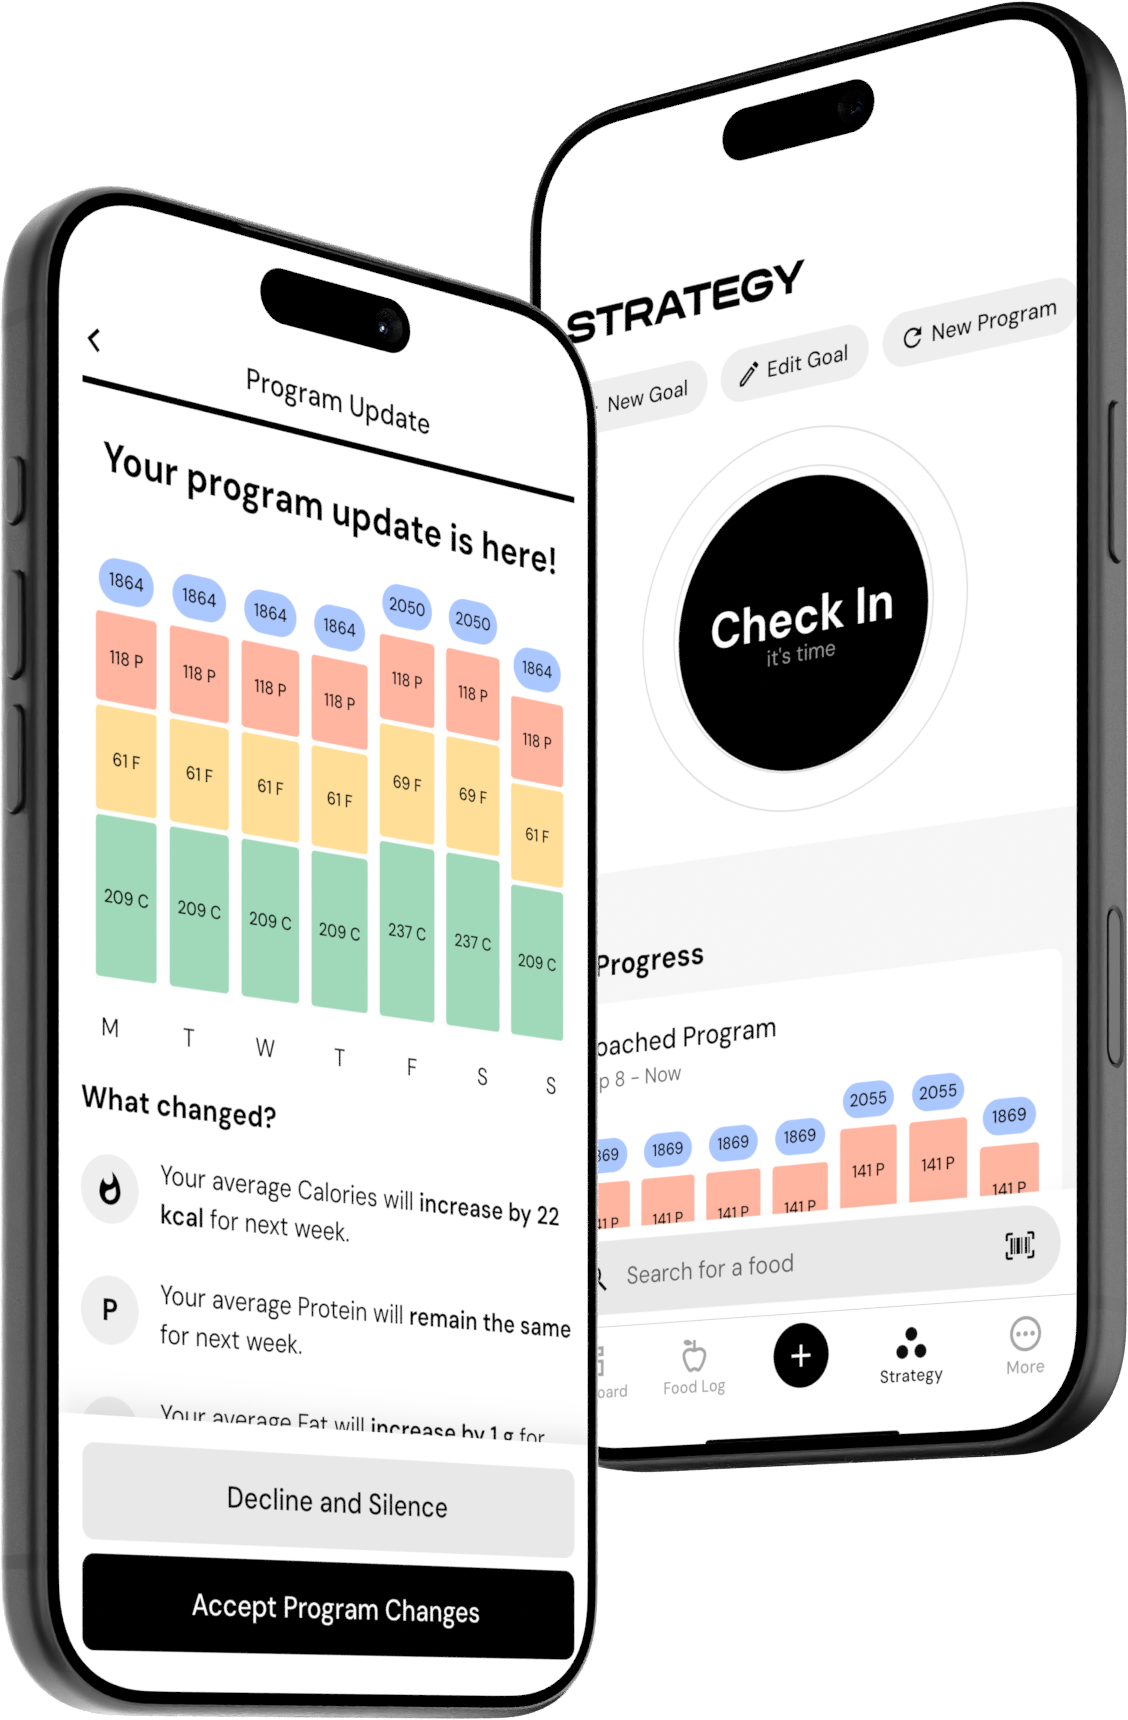
For my own cut, I use MacroFactor, the nutrition app I helped develop. It starts with questions about your goals and preferences, estimates your energy needs, and builds an individualized nutrition plan.
From there, you log your bodyweight and food intake. Weekly check-ins use that information to update your estimated expenditure and nutrition targets as your needs change.
We've also built in barcode scanning, multifood plate logging, and an AI photo feature that estimates food and macros from a picture. Photo estimates won't always get every amount right, but you can adjust them rather than entering every ingredient from scratch.
|
This information is educational and isn't medical advice. Consult a physician before starting an exercise program, particularly if you have existing pain or a medical condition.


